Presumably you arrived here after visiting the Doll House Intro page, which provided some background information leading up to the design and construction, and some of the non-technical aspects of the project. If not, you might want to give it a look first.
This Timeline document expands on the Doll House Intro with descriptions of the design, building, and logistical aspects. It includes:
The timeline includes clickable links to the individual relevant challenges, and the challenges include links to help you return from whence you came. Or you can just read the whole thing straight through, given sufficient caffeine.
As we proceed through the document, you'll notice a few links to the occasional video or drawing. I've also collected those in separate collections:
In case you should wonder why I built the Doll House pretty much completely by myself, I refer you to Solo Worker Self-Analysis.
I am not much of a journal-keeper or note taker, so this timeline was created by a forensic analysis of my drawings, sketches, notes, calendar entries, dated photographs, and purchase receipts.
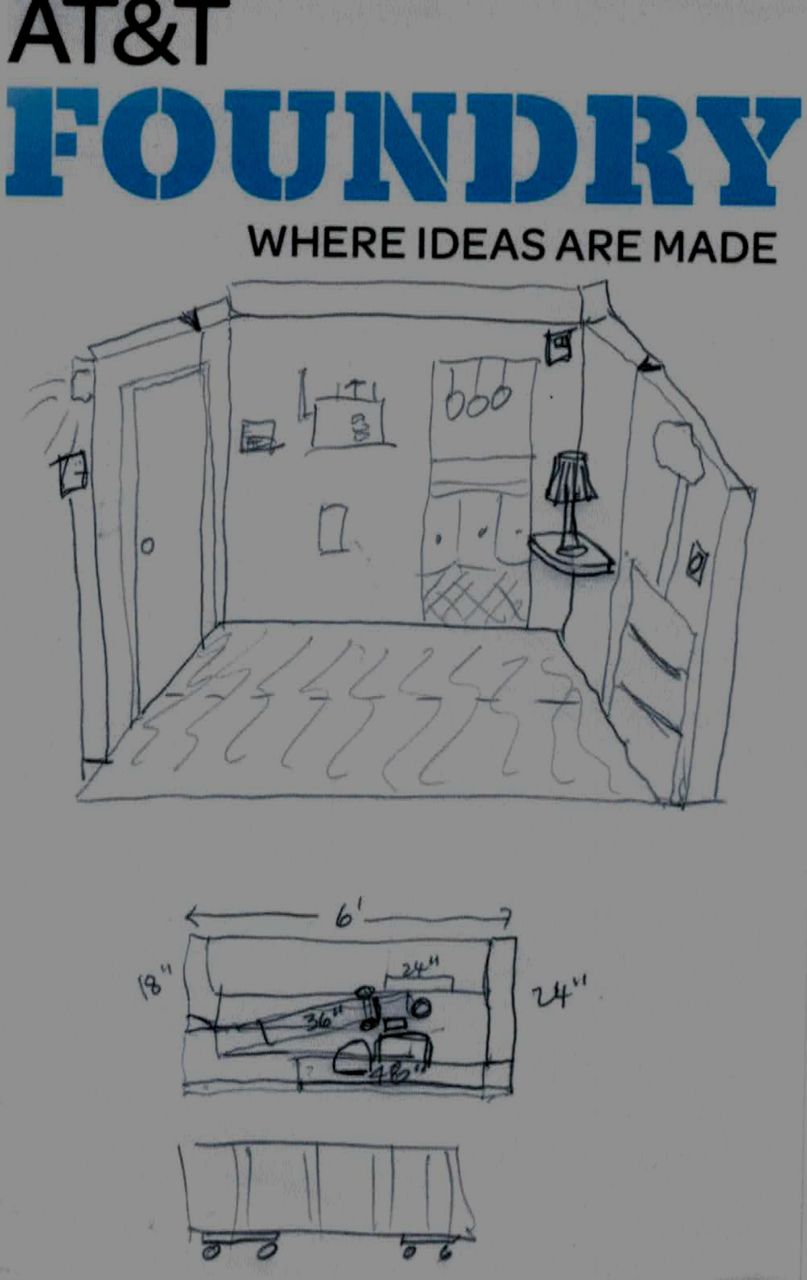
As near as I can tell, Thursday, November 6 was the day Virginia first asked me about building the Doll House. Here are the first sketches I made of the main concepts, what it would look like, how it would fold up, and how it would be transported. Notice that the original design was going to be six feet wide. After a little thought, I realized that would make it too large to handle and impractical to ship.
The next design step was to formalize my assumptions and thoughts into a more detailed electronic version. I used Powerpoint for speed. Here's a .pdf version of that original three-page deck, which I hereby grant you permission to peruse.
In some ways the Doll House was based on the Dog House briefly described in the Doll House Intro posting. But because it was intended for a different purpose, the Doll House had additional requirements.
With general approval from Virginia, I began to tie down some details.
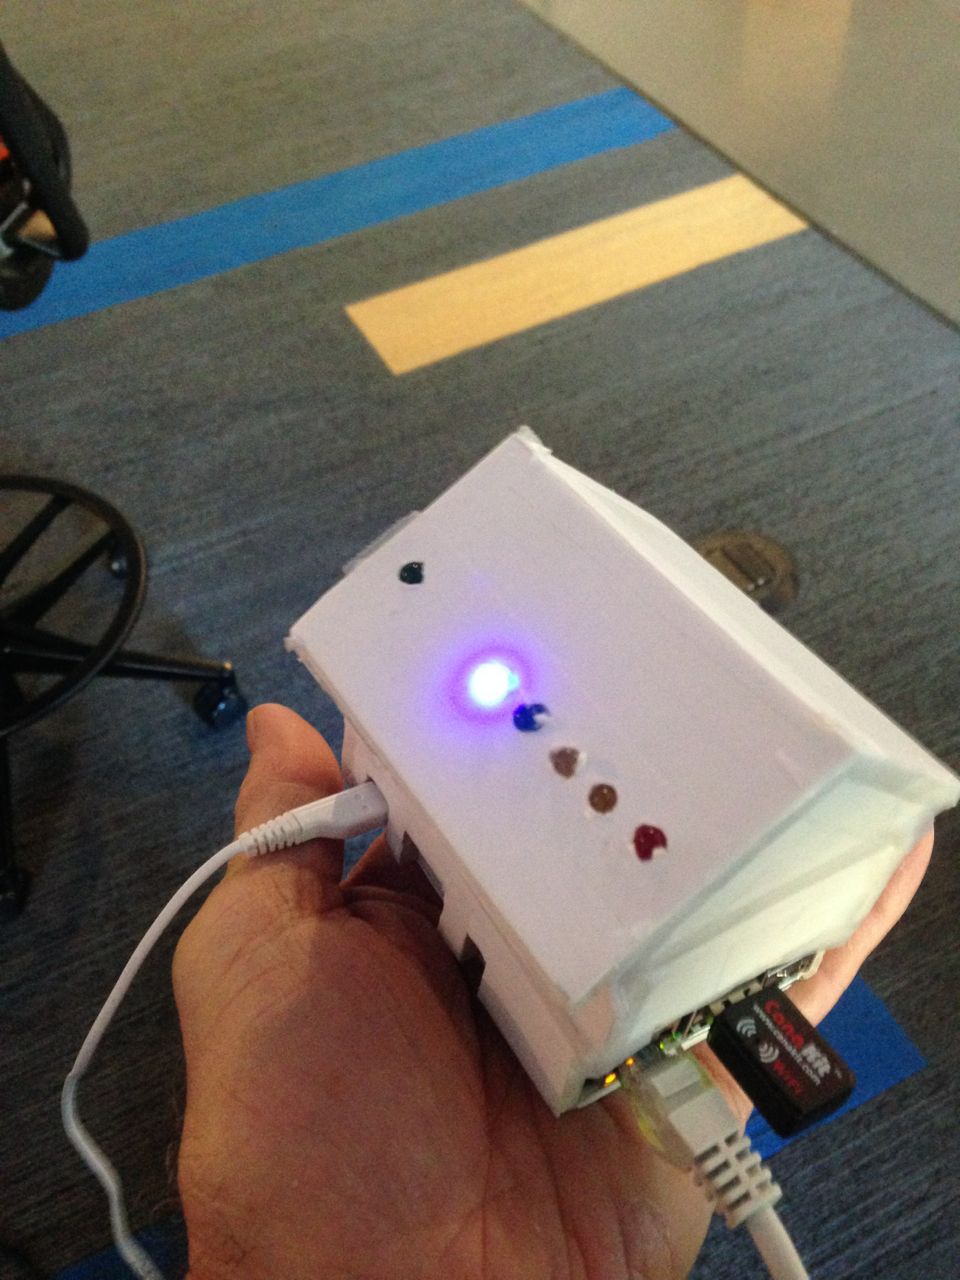
The original Pi House concept exposed an Application Programming Interface (API) to separately control 5 LEDs, each representing some device in a residence . To simplify the design of the Pi House, no sensors or inputs were included in the Pi House, even though sensors are key elements in a typical Digital Life installation.
To get started on the Doll House design, I needed to specify what five items would be controlled. I thought about what sort of applications developers might come up with, and decided to support three lights, an electric door lock, and a garage door. The lights are relatively simple - they could use Digital Life-controlled PowerPlugs. The electric door lock has always seemed like a useful device to me, and I was familiar with its operation from the Dog House implementation. The garage door was really the only wild card. Ever since the Digital Life garage door controller became available, Foundry people have been asking for a garage door, especially those working on connected car applications. The Doll House seemed like a good opportunity for me to better understand the Digital Life garage door controller.
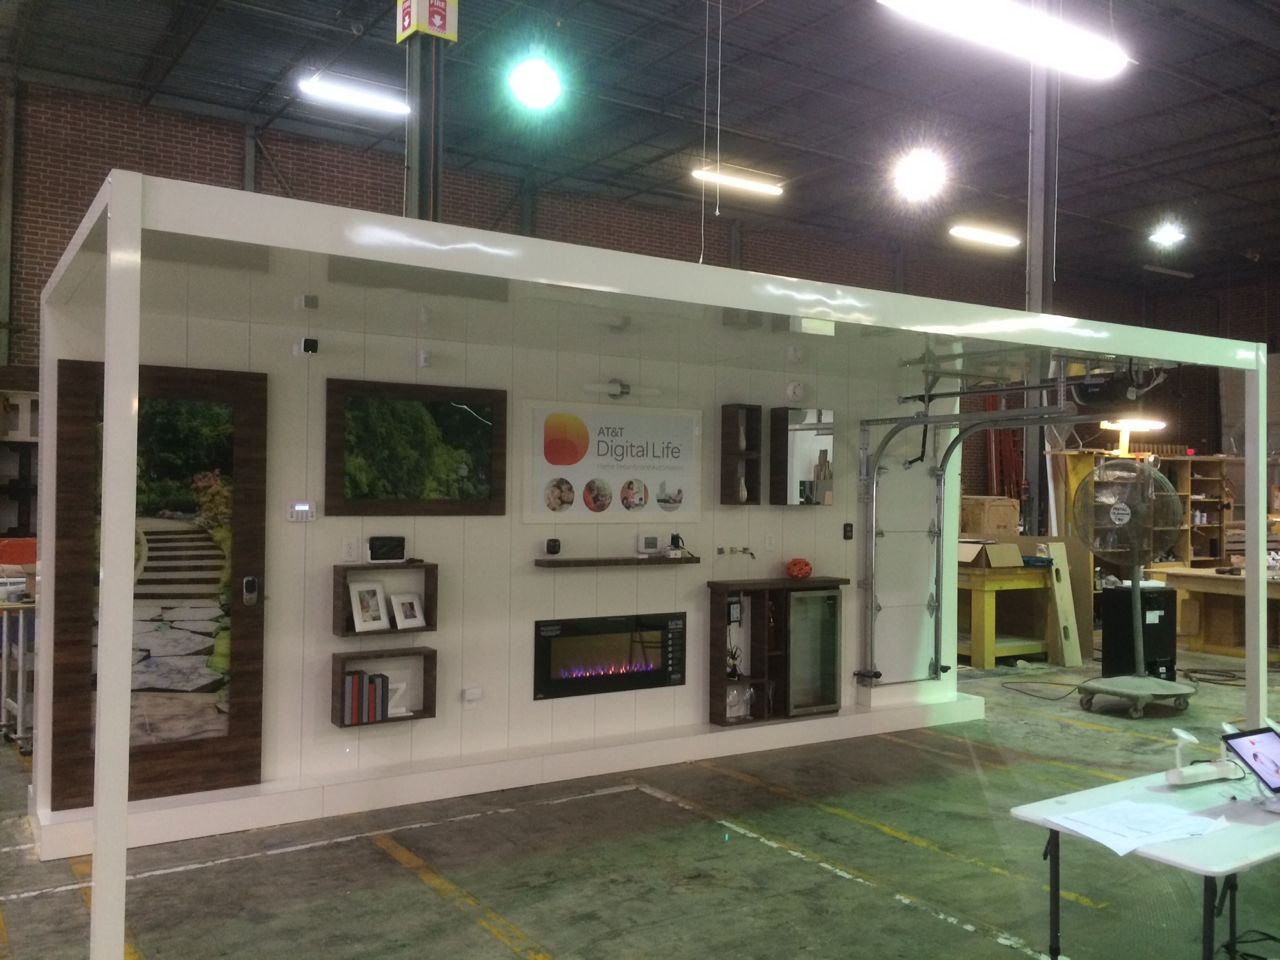
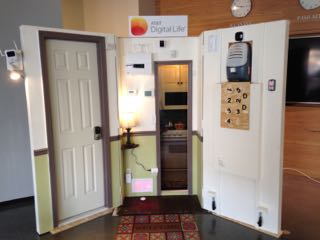
The selection of those devices led me to the concept of the living room as the primary visible space, with a door leading "outside of the house" on one side, and a garage door on the opposite side. (In retrospect, that produced a Wonko The Sane Asylum aspect to the house, but at the time it made sense.) That gave me a living room light, and an outdoor light to work with. To get a third light, I decided to add a narrowish door opening which would appear to lead from the living room to another room. I decided on making that room the kitchen, since many of the objects in a kitchen are distinctive and obvious. I figured I could use a photograph of a kitchen set in a space behind the narrow door opening, and mount a light at the top of the inset. When that light was turned on, I hoped that it would look more or less like someone had actually turned on the kitchen light.
I think my first thought was to make the whole thing squared up, like 3 walls of a small room, all perpendicular and parallel, just as if the front, fourth wall were invisible. In that configuration, for example, the door lock on the outside would be visible to people on the left side, but not to those on the right or in the center. But I must have realized early on that a better configuration would be to fold the walls back at an angle on each side. That also removed the need for "exterior" covering on the back of the left and right walls. Even my first sketch seems to have included the concept of slanting the walls back.
My first actual purchases were sort of a milestone. Up until that point, I could have called the whole thing off, I guess. But spending company money on a Genie garage door controller, plywood, studs, and screws, felt like I was committing to the project.
I sequenced my work so that I could try out the least predictable aspects early, giving me time to modify the design if necessary. (Don reminded me later that good software developers do the same thing.) Because I had never used the Digital Life garage door controller, I picked the garage section as my first object to build. Since the first time I thought about building a garage door, I had intended to use a real, standard, store-bought garage door opening system. While it might have been easier to create some sort of simulation of a garage door, I wanted to make sure that the operational interactions were as close as possible to a real garage door installation. This would (and did!) answer a lot of questions I had about the Digital Life solution.
Several years ago, my friend and co-worker Steve L. was asked by DL to build a scale model garage door. He experimented with several designs and components, but eventually abandoned the effort, due to a change in priority from DL. Since then, I've pondered ways to accomplish a similar task.
The DL trade show display previously mentioned accomplished it by building a full-height, two-foot wide garage door in a conventional orientation using standard garage door components. That appears to be one of the reasons that the trade show display had to be 9 feet high and 9 feet deep.
For the Doll House, I figured pretty early that I would have to build some sort of vertical garage door. (Technically one could design and build a more conventional version that folded up, but the complexity of that sort of solution, not to mention the weight and space requirements, scared me off, especially with the time limits I was facing.)
Building a vertical door introduced three considerations:
When I first got it working, I made a short video to share with my coworkers, who were appropriately baffled, since they hadn't seen the overall plan.
For more on the garage door see GD Challenges.
Once I had built the garage door frame, it was time to build the sliding door portion, so I bought the hardware and wood I figured I would need.
I've written a short sub-article, Work Pace Monologue in which I describe my time/energy/thought approach. I think the successful outcome of the project was due in large part to this approach.
After a brief period finishing up some other work and personal tasks, I jumped back into Doll House construction with renewed energy, starting with the purchase of more wood.
In the Work Pace posting, I mentioned doing research for future design while buying current supplies. On this particular trip, I took photos of potential table lamp options, colored CF bulbs, and kitchen LED strips.
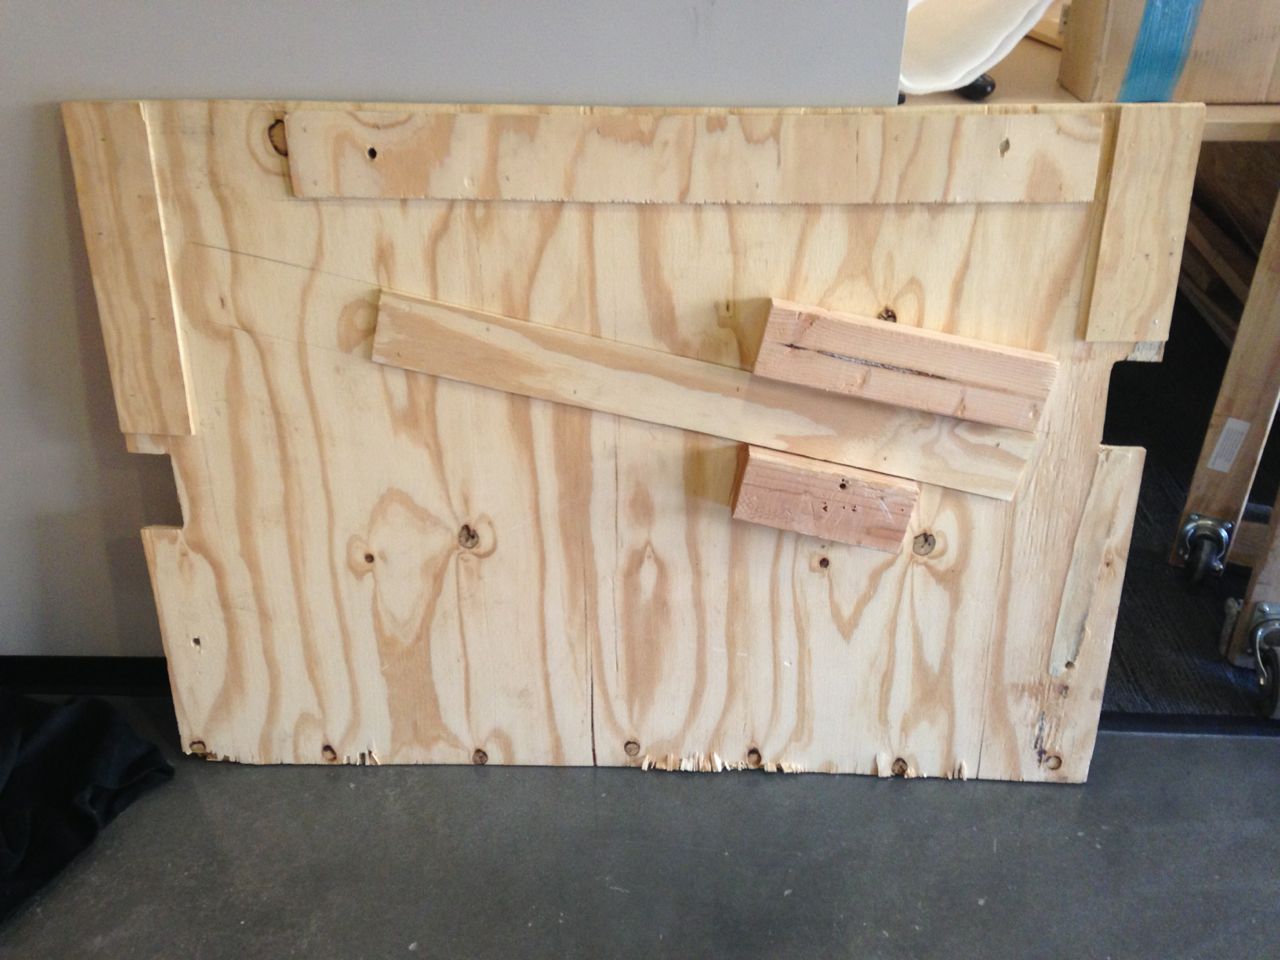
As I was designing the frame for the garage door, one of my first decisions driven by durability was to leave the footer boards for the garage and living room doors intact for strength. Cutting them out, while it might make it look more like a residence, would allow the adjacent sides of the doors to flop around when the structure was moved during building and shipping. I could have added some kind of external braces, but that would take more material, more design, and more time.
The need for strength and reliability drove other decisions as I began to assemble more framing.

The use of screws led me to another mounting practice. Most of the screws included with devices such as the garage door pushbutton are an inch long, which leaves a sharp point sticking out the back of the quarter-inch plywood paneling. Although that wouldn't be seen, I was concerned that the people who had to pack and transport the Doll House might get stuck. Plus it seemed, well, unprofessional; So I cut little wooden squares to drive the screws into. And since someone might have to remove the screws for some good reason, I decided to wood-glue the squares in place. It still seems like the right thing to do, but it took a surprising amount of time to attend to that sort of detail.
The Sunday of Thanksgiving week I designed and started building additional frames.
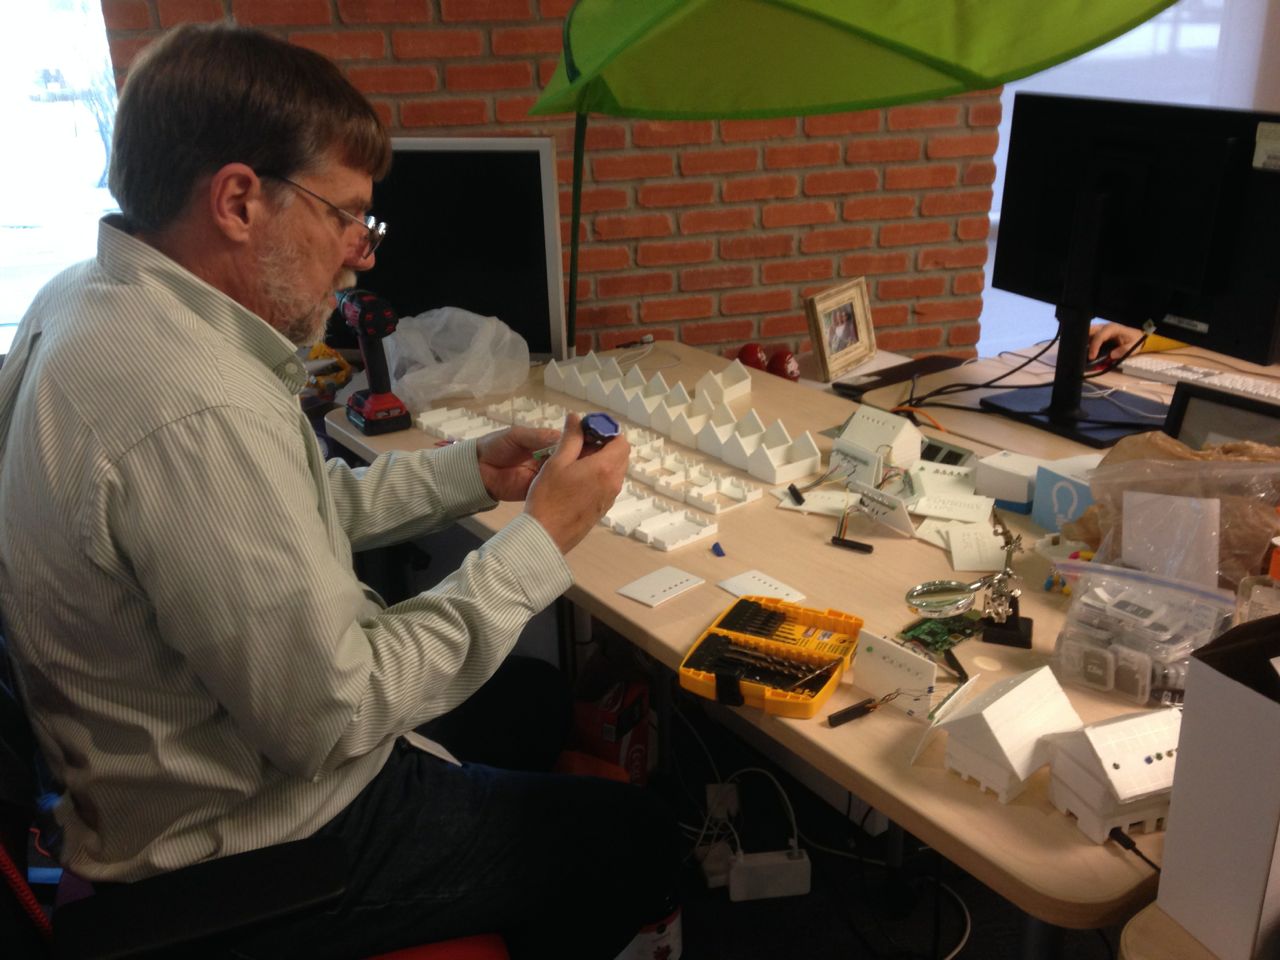
On Monday I went in to the office, and while I was there, snapped a picture of Don slaving away on the Pi Houses assembly line.
On Tuesday, it was back to the shop, and a trip to Lowe's, where I bought primer, the hinges for the side walls, and a paint roller. At this point I had accepted the idea that not only was I going to have to paint, but it needed to look good. Hence the primer.
As I mentioned in the Intro, the Doll House began to take on more of a key role midway into the project, when some of the Dev Summit event planners decided they would use it, not only for the hackathon finals, but also on stage at the Developer's Conference. Two things became clear: (1) people (especially those who had seen the Dog House) were worried that the Doll House might look, well, "tacky." Thus (2) I needed to up my game in the decorator department. I tried to get several different stakeholders to make some color suggestions, including the event planners and the logo people. (The logo people had come forward about the same time to make sure there would be a visible logo on the Doll House.) But they didn't take the bait.
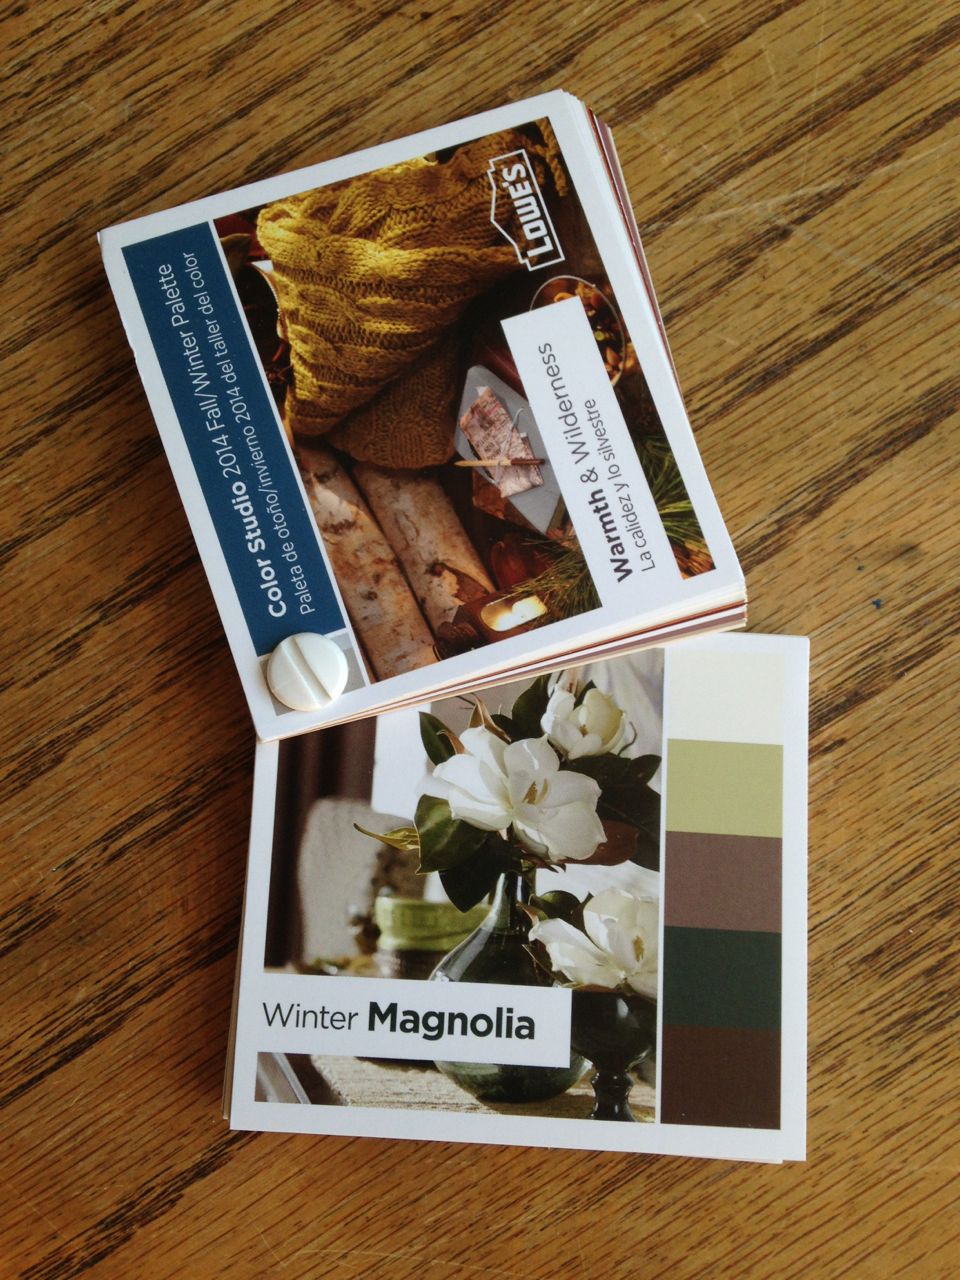
Finally, I did the engineer thing, and consulted a reference book and an expert. The Lowe's Paint Department had an array of paint chips, including a small booklet from Valspar recommending winter color combinations (the reference book). I picked "Winter Magnolia." I discussed the options with my spouse (the expert), and picked three colors. To break up the wall area, I added a chair rail, and I also used wood stain, primer and caulk, just as if it were a "real" house. (For the original design, I had a more comprehensive paint layout in mind, with simulated grass, and a concrete-looking garage floor. I just ran out of time to get that part done, but it turns out that it wouldn't have been visible from the audience anyway.)
I promised the event planners I would have something for them to look at by Monday, December 1.
On Wednesday, I continued building and priming. I also took time out to take a photo of my own kitchen, crop it into two poster-sized pieces, and send it to Walgreens to be printed.
With much gratitude for rest, family, and food (not necessarily in that order), I took Thanksgiving Day off.
On Friday and Saturday, it was back to work. I drew up the specifications for the remaining frames, and assembled them.
Part of the design, visible even in the first sketch, was that the hinge angle was created by angling only "legs" of the center section. This simplified the construction of the living room door and garage door frames. They could be built conventionally, like a stud wall, with no angles. These left and right walls both had mechanical aspects and moving parts, so it was nice to build those with conventional frames.

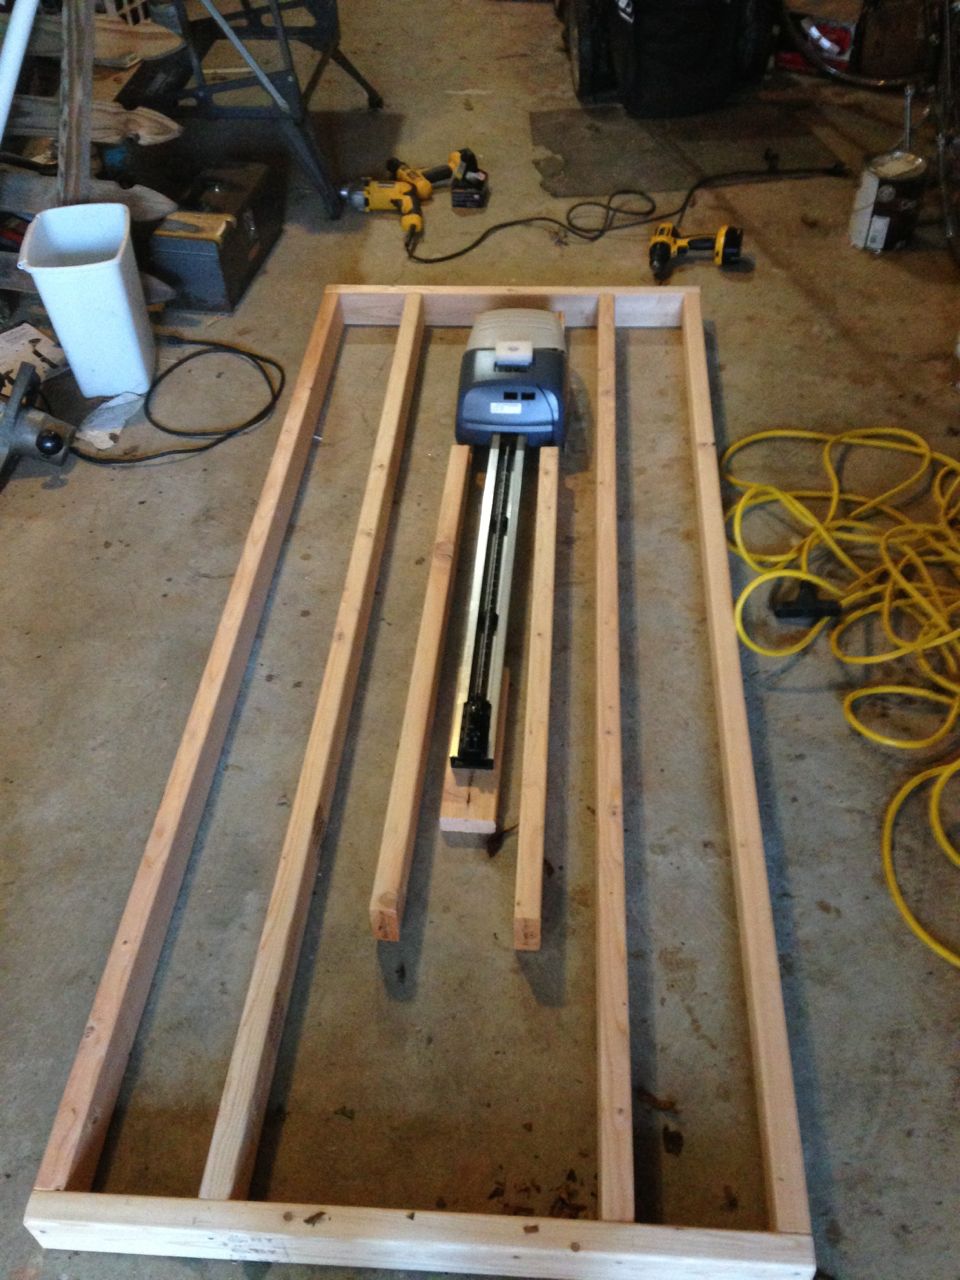
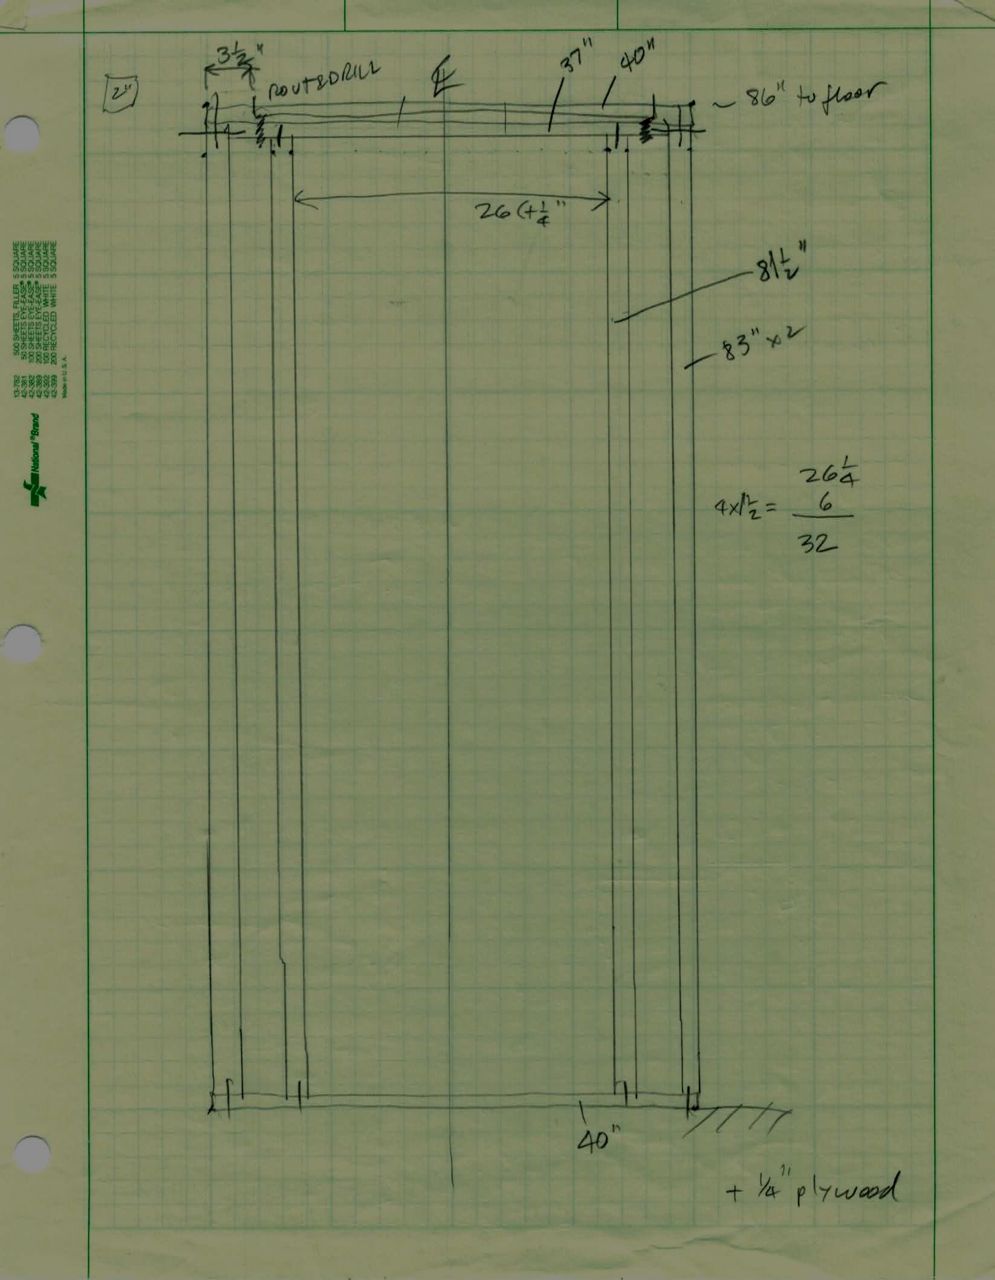
The center section, which I thought of as the "backbone", didn't have any moving parts, so I could focus on the hinge angles. Here is the drawing I made for the pieces of the center section. The end pieces where the hinges attach were constructed of 2x6s. I had to cut off a 45-degree bevel on both sides of each seven-foot piece, which was one of the more challenging aspects of the frame construction. Because of the length of the pieces, I had to recruit my spouse to support one end of the board as I fed it through my table saw.
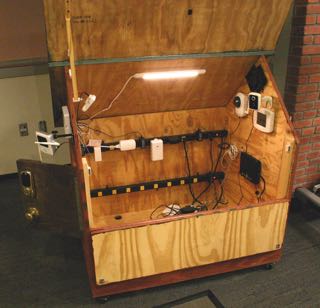
The frame construction also had to accommodate power and Ethernet cables. I figured out the wiring requirements early in the project just to make sure I wasn't forgetting something, or building something that wouldn't allow the necessary connectivity. This was pretty easy on the garage door side, since there was plenty of wiring room around the control head, and I only had to provide a power outlet. And it was a piece of cake in the center section, since it was going to be a foot deep.
But on the living room door side, I had to allow a path for power and Ethernet to pass over the top of the door to get to the "outdoor" spot and camera. I figured it would be awkward having the wire crossing in the middle of the door opening :) . I accomplished this by routing a groove in the top of the door header, which was made of two 2x4s, and drilling a hole down through the remaining header into the wiring space.
Those of you familiar with Digital Life devices may be asking, "Why Ethernet cables? Aren't all of the Digital life devices connected by wireless networking?" Well, that's a good question, and very observant of you. (And if you contact me, I'll buy you a cup of coffee for your cleverness.)
AT&T has learned over several years of hackathons and developer conferences that the WiFi radio frequencies are massively overloaded when all those nerds get together with their phones, laptops, and other devices. It is strongly recommended that any critical demo avoid the use of WiFi if at all possible.
Fortunately, the DL cameras happily support Ethernet connectivity.
Finally, I had to make sure that the places where the wire passes through the hinged area wouldn't be likely to pinch the wire. I had already decided to use Type SJ neoprene-covered wire for all power wiring, since it is intended for flexible applications. I carefully marked and drilled 1" diameter holes so they would align when the sides were opened, then pulled the power cable and the Ethernet cable through together. I zip-tied the cables together so they would support each other.
On Sunday, November 30, I took a short video of my spouse, in full Vanna White mode, walking around the Doll house to give the event planners an idea of where we were, and what it would look like.
I e-mailed the video to the event planners; they seemed somewhat reassured that I hadn't been just making the whole thing up.
At this point, with the main elements built, I was in full-on detail mode. I made my largest purchase at Lowe's, including paint, hardware, bulbs, the living room lamp, and electrical wiring supplies.
On Tuesday, I went into the office to take care of some other work. While I was there, the event planners and I had a phone call to discuss how the Doll House would be used in Las vegas, and whether they would be able to move it between venues. I assured them that the design would support what they needed (hoping desperately that I was right!)
On Wednesday, it was back to the details. I cut a small door in the garage cover over the garage mechanism. This door was used to mount and operate the tilt sensor (see GD Challenges if you haven't already).
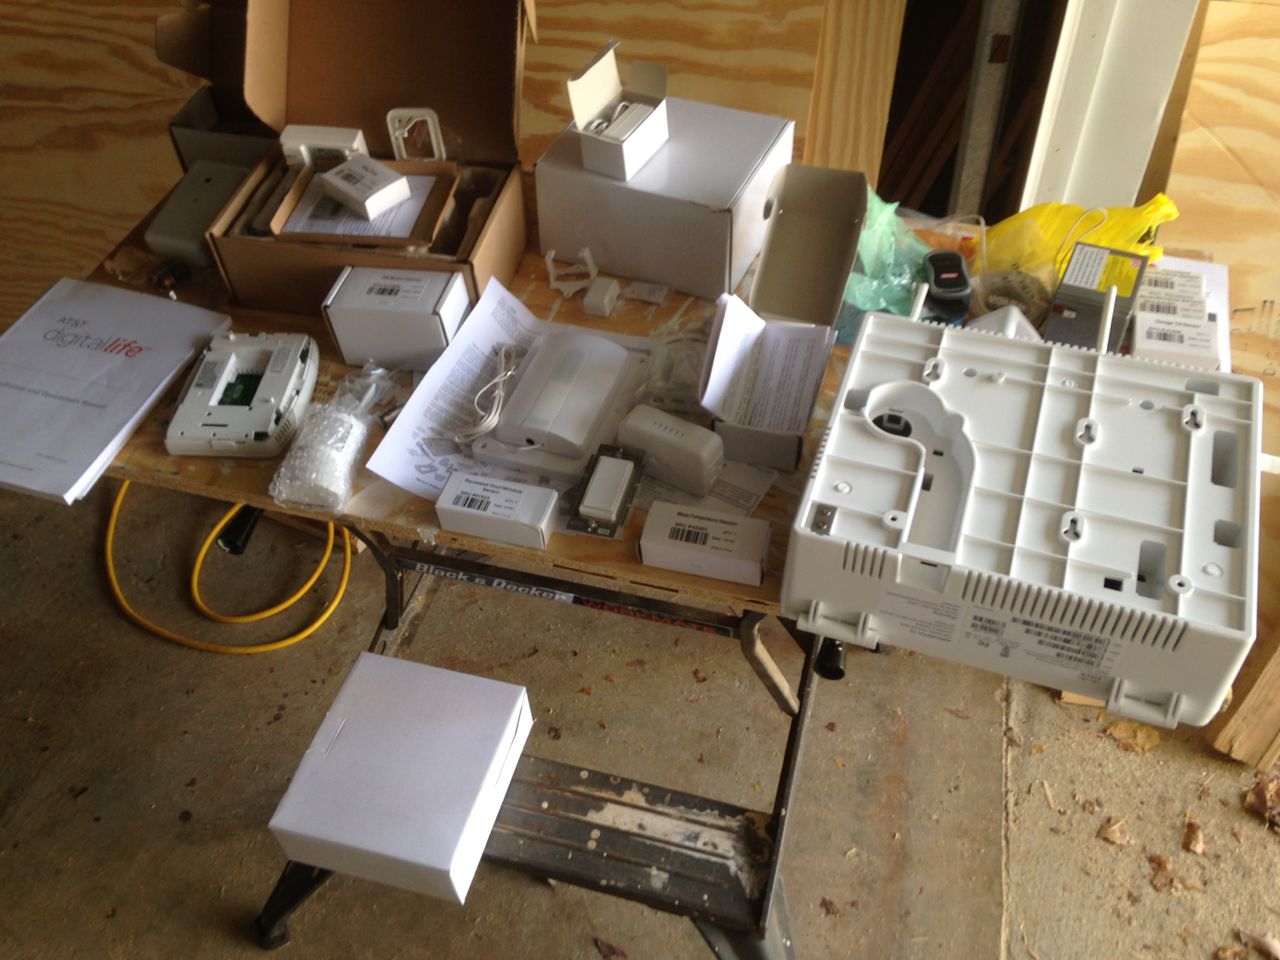
I unpacked and spread out most of the Digital Life devices so I could start to mount them.
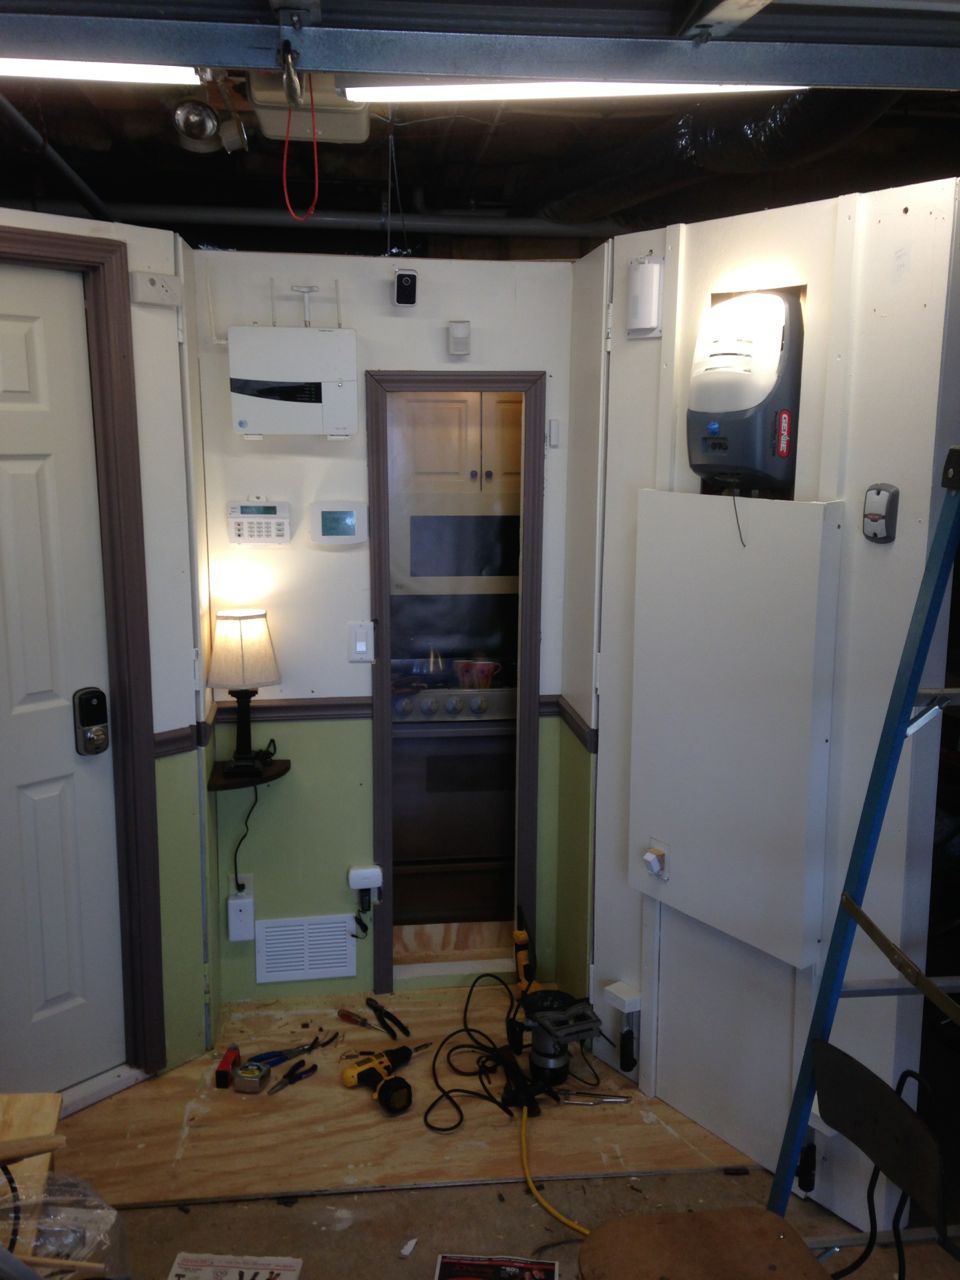
Up to this point, I had done most of my work during daylight hours. The Doll House was located inside a garage door, and the outside light was sufficient for sawing and general assembly. But it dawned on me that if I had better lighting, I could not only work later hours, I could actually see to paint.
So I took a little side venture to purchase and install a couple of two-bulb fluorescent shop lights. (I paid for those personally, by the way, and they have already come in handy for some of my home projects.) It made a huge difference -- two thumbs up for good lighting!
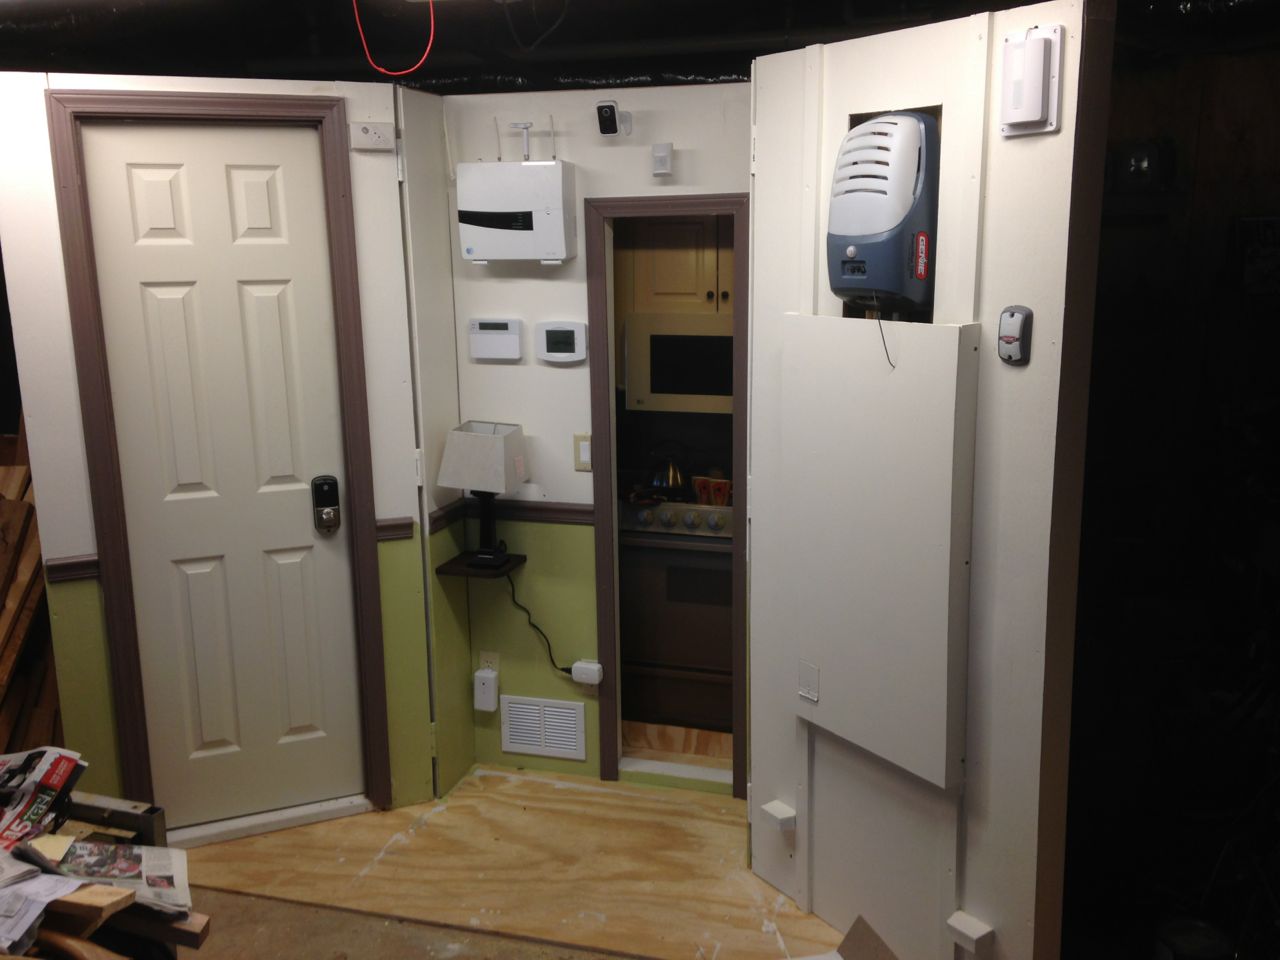
Once again, the event planners wisely enquired if I had anything else to show them. So I buckled down and painted the finish coat, and, barely allowing time to dry, began to install the devices. It went fairly fast, because I had pre-drilled most of the holes.
When I got everything mounted, I snapped a photo to send them. (I didn't bother them with the detail that none of it was wired yet!)
Their decision to use the Doll House at the Developer's Conference added an interesting twist. The Doll House would only be on stage during a brief part of the program. A guy named Butch, who had already agreed to receive and help set up the Doll House in Las Vegas, would also be building a rolling platform that would be used to move the Doll House onto and off of the stage as needed. Butch requested detailed dimensions, so I sketched a quick floor plan and sent to Butch.
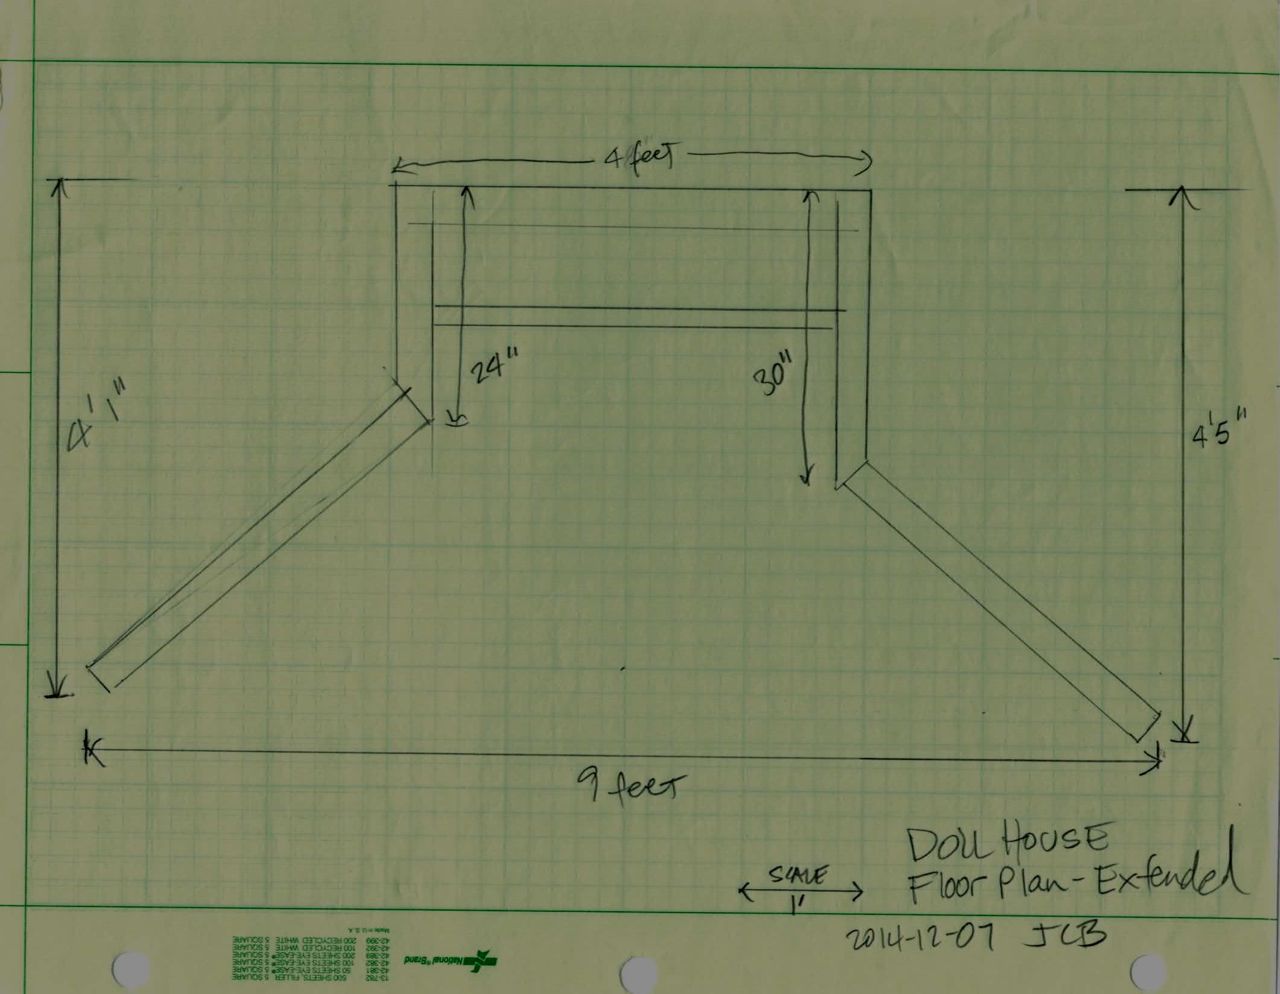
In the middle of the night, I realized that my floor plan didn't include the entire plan, so I drew up a better one, and sent it. (See Sketches and Drawings.) It turns out that they wisely decided to use the smaller version anyway.)
Despite my sketchy sketches, Butch's platform worked great.
After I got everything assembled, I noticed that the empty space at the end of the chair rail was more noticeable than I had anticipated. (I had to cut the chair rail short to allow the sides to fold in.) So I painted the chair rail color past the end of the chair rail, and even back into the hinge area. I thought the finished product looked pretty good, at least from a distance.
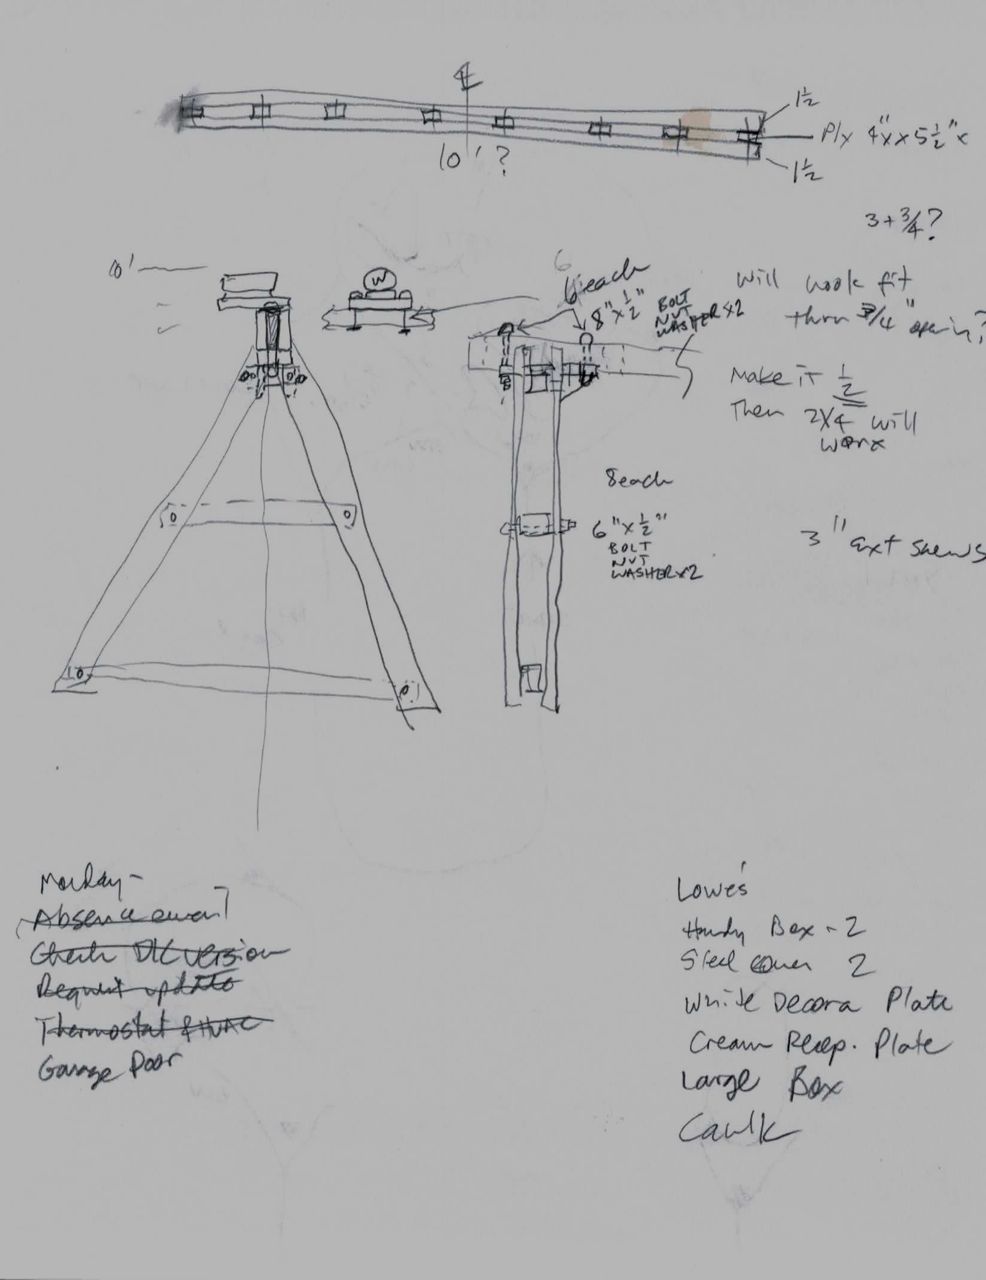
I spent Wednesday at the office, because it was our Holiday Pot Luck dinner. But I was already thinking about how I was going to need to lift the Doll House to work on it's floor panel, and to flip it on its back when the time came. I sketched up a design for an A-frame that I could use, with a winch, to lift the whole mechanism.
The challenges of the A-frame are described in Heavy Lifting.
While I continued wiring up devices, I had also realized that the living room "table" and its lamp were too big to allow the left wing to close. My Ever-Patient Spouse was out running errands, so I asked her to try to find me a smaller lamp, which she did. The final version was composed of the steel base of the original lamp, and the rounded shade from the new one.

One of the more technical aspects of the construction was to properly associate the devices with the Digital Life Controller (DLC). This is most easily accomplished using a computer connected directly to the controller. Fortunately I had an old Mac Mini lying around that served nicely. In addition to the direct connection, I also had to connect the DLC to the internet so, like E.T., it could "phone home." I had to buy a 100-foot-long Ethernet cable to connect it to one of my home routers at the "business" end of the downstairs garage. I had somehow failed to foresee the need for internet connectivity in the woodworking portion of the shop. Doh!
More wiring! For reliability, I used crimp-on connectors wherever possible, and bolted down as many pieces as possible.
This is also around the time I built the heating/air-conditioning indicator behind the register, installed my HVAC simulator, and wired the two together.
The challenges of this part are detailed in Red and Blue.
On this Wednesday, it was back to Lowe's for more electrical boxes and covers, also u-bolts.
And I'm now wiring at a frantic pace. (Well, sorta. See Work Pace if you haven't already.)
By Friday, I finally had all of the devices wired up and illuminated, just in time to head out of town for a Christmas celebration with my sisters and all of our families.
The clock is definitely ticking now. At this point, I needed to either build the A-frame, or start hiring day-laborers to come help me pick the dang thing up. I bought the 2x6s for the A-frame, the bolts I thought I would need, and a couple of furniture dollies, which, if you recall, were part of the original transport design.
Once I was home again, I built part of the A-frame.
I took Christmas Eve and Christmas Day off. I nearly had to re-introduce myself to my spouse. "Oh, you're the one who keeps making noise downstairs." "Yes, honey, that's me."
In the wee hours of Friday morning, I realized that, despite all the e-mails I had exchanged about paint, logistics, size, and logo placement, no one had actually told me when it had to be finished. So I woke up early and looked up the Developer Conference on the internet. Imagine my surprise when I discovered that the conference was schedule to start in 8 days, a duration which spanned New Year's Eve and New Year's Day. And included at least two solid days of driving for somebody.
For the details of shipping, see Logistic Challenges.
It also turns out I had mis-calculated on a couple of bolts, so it was back to Lowe's to buy even more.
And with my new bolts, I managed to finish several more pieces of the A-frame.
On Saturday, it was back to Lowe's for packing materials (chain, bolts), and just a few more pieces of wood for the A-frame wood.
While I was out, I picked up the Digital Life logo from Walgreens, which I had scaled and e-mailed for printing.
I had already bought 2500-pound-capacity All-Terrain Vehicle winch from our local Tractor Supply store. (Like the shop lights, I paid for that, too, since I fully intended to keep it and re-use it.) I mounted it to the top crossbeam of the A-frame, and wired it to a 12-volt battery.
I attached the top crossbeam, and completed the A-frame.
I also built a shipping plate for the top of the Doll House. This plate would bolt to the top of the folded Doll House, and pieces of 2x4 on the plate would hold the left folded wing in place during shipment. In addition, the top shipping plate would have bolt holes with which I would secure the right wing in its folded position.
I couldn't put it off any longer. I had to try the A-frame. I attached the beam to the chains, connected the winch hook, and gingerly, from a distance, bumped the "up" button on the winch control
Much to my delight, it lifted it up nice and straight, with no ominous groaning or cracking. (I shouldn't have been too surprised. It was safely over-engineered. Still my engineering was based on estimates of the weight.)
With the Doll House safely suspended over the floor, I was able to attach the bottom plate with carriage bolts.
As a matter of note, I used carriage bolts for assemblies that were NOT to be disassembled during setup, since they have rounded heads. I used regular, hex-head machine bolts for the shipping connections, so the folks at the other end would know what to remove.
On this Sunday morning, I sat in as substitute guitarist at MPFBC's morning service; it was a modest, post-Christmas crowd.
On the way home, I stopped by Fry's to buy a relay and enclosure for the garage door circuit described in GD Challenges.
And it was back to Lowe's for just a few more half-inch bolts for the shipping connection points.
That afternoon I drew up and built the garage door circuit.
As described in Logistic Challenges, I spent a fair amount of Monday exchanging e-mails with the trade show management company, who had suddenly realized that they were committed to get a Doll House from my shop to Las Vegas within the next 4 days.
As for me, I was down to the last few items, casting aside some niceties that I had hoped to do.
I installed the garage door adapter circuit, and thank goodness, it worked.
Don came over and helped secure the wiring to the frame, and helped me with final assembly and shipping preparation. We lifted it up again with the A-frame , tilted it back and lowered onto the furniture dollies.
At that point, it was just a matter of "hurry up and wait" for the truck driver, who was scheduled to arrive at 10:00 AM the next morning (Tuesday).
At 7:00 I was at Lowe's, where I bought 2 more dollies, plus a plastic storage bin so I could ship all of the device documentation, and the leftover paint to Vegas. (Hey, why not? No extra charge, right?) I also picked up a cheap plastic drop cloth because it was threatening to rain around 10:00, when we expected to be loading.
As described in Logistic Challenges, the driver showed up at 8:00. I had to call Don to rush on over earlier than planned to help me and driver load the Doll House onto truck. The driver strapped it down like a pro, and took off for Vegas. That is, he took off after spending 15 minutes in the driveway trying to figure out how to enter the address into his GPS. (I don't think Siri speaks Moldovan.)
It would be nice to think that my work and worrying were over at that point, but, alas, not so.
Not only did I have to worry about the following ...
... but I was still committed to support eight magnetic contacts, so the Doll House devices would match the devices on the Igloos.
The truck arrived in Las Vegas about twelve hours early, the evening of New Year's Day. Butch graciously helped the driver unload the Doll House at the trade show shop Butch had set up.
While the team in Las Vegas was sleeping, getting ready to move the Doll House into position and set it up, I was busy buying parts for the Contact Management System I had dreamed up.
The full story can be found at Zombie Attack.
By 1:00 PM, I had finished building the Contact Management System and shipped it overnight, Saturday Delivery, to Vegas.
Don, Virginia and the Las Vegas team set up Doll House in the Rain meeting room, where the Hackathon was just about to begin.
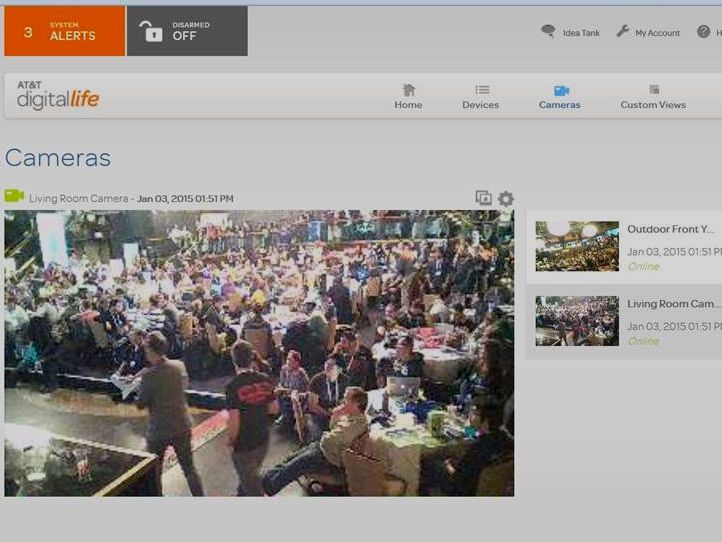
The Hackathon started, and I was able to take a screen shot of the meeting room using a Digital Life camera on the Doll House. This meant that it was set up, powered up, connected up, and working! Euphoria!)
The Doll House was used for the Hackathon semi-finals; two of the three semi-finalist teams had built applications based on the Digital Life APIs.
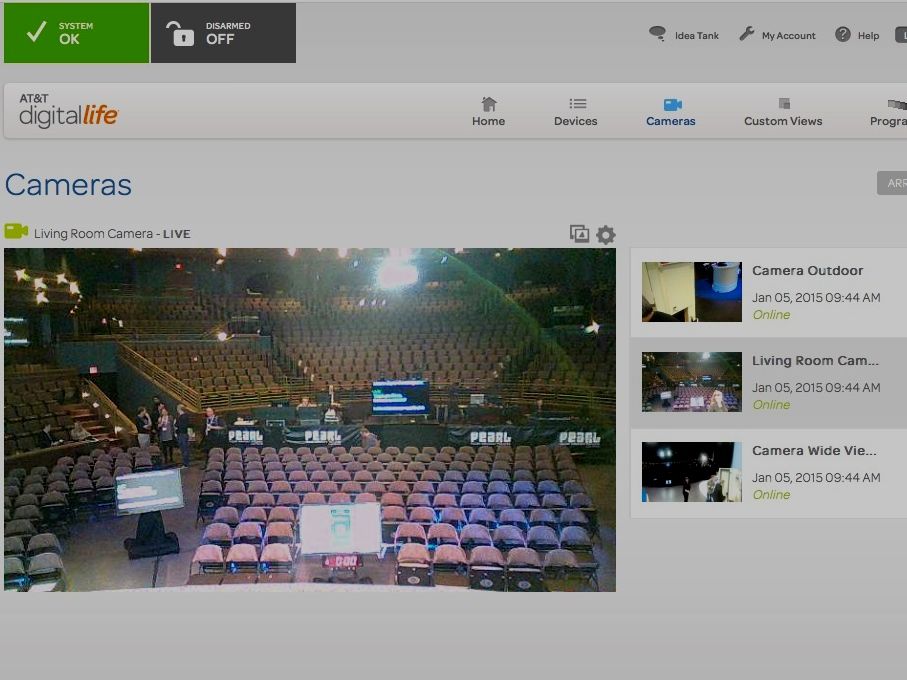
At the conclusion of Hackathon (around 6PM), the Doll House was disconnected, folded up, tipped over, pushed through the Palms casino area, and onto a freight elevator. Then it was pushed into the Pearl Theater, where it was stood up, unfolded, powered, and connected. Once again I took screen shot of the surroundings using the Doll House camera as a confirmation of "life."
During the Developer Conference portion of the Dev Summit, the Doll House was successfully used for two of three Finalist Team presentations. (Successful in that the Doll House worked as expected. Not successful, since the final winner was the third application.)
After the Developer Conference was over, Butch folded up the Doll House and bolted on the shipping braces so it could be returned to The Foundry in Atlanta "on a slow boat."
The Doll House was delivered to the Foundry with minimal damage, set up, and confirmed to be operational. Yee-Ha!
This Friday was a Foundry Open House day, and the Doll House successfully began its new life as a demo stop for tours.
For the accountants among you, it took me approximately 120 hours of "labor" over around 20 working days (60 calendar days) to build the Doll House. The materials cost charged to the company (not including the Digital Life devices) was $2140.08.
And thus endeth the Tale of the Doll House.
Except for those who haven't already clicked on the "Challenge" links, and who haven't quite had enough. Enjoy!
This section details some of the challenges I had to deal with building the Doll House. Some of them were unpredictable, but there were also a few areas where I was at fault, because I failed to apply my previously-described, multiple-step design approach. The tilt switch, the HVAC light housing, and the location of the electrical boxes adjacent to the kitchen door frame all required considerable re-work. I'll cover most of these details in the section below.
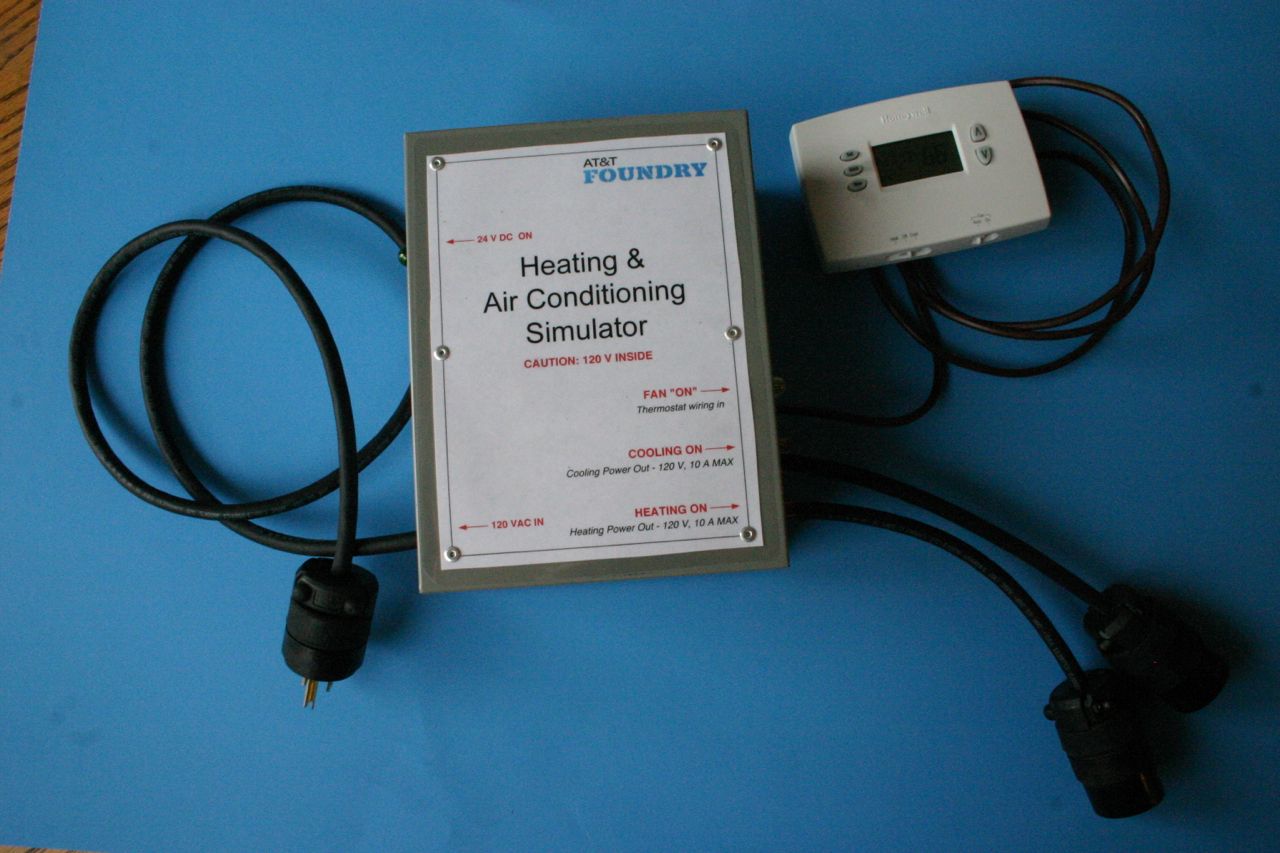
One of the Digital Life devices with which I was familiar was the thermostat. In the middle of 2014, I had decided to build a Heater-Ventilator-Air Conditioner (HVAC) simulator for the Doll House. The main purpose was to provide 24-volt, alternating current to power the thermostat. But I figured while I was at it, I would add some lights to indicate when the thermostat was calling for heating or cooling. And if I was going to that much trouble, I decided to go ahead and include a couple of 24-volt relays to power actual devices. A lot of our Dog House-related work is done from a distance across the Foundry, so we have conjured up various ways to tell what is happening from a distance. Plus, the visuals add impact to the demonstrations we occasionally do.
My original plan for the thermostat was to let the heating circuit turn on a heat lamp pointed at the thermostat itself. That way you could actually make it cycle realistically if you wanted to. For the cooling cycle, I decided on a small fan, which technically doesn't cool. But if the heat lamp has artificially heated the area around the thermostat, the fan will help return it the the ambient air temperature of the room, which looks like cooling.
The last addition to last summer's HVAC simulator was to build, not one, but two. At a minimum, I thought someone from Digital Life might want one. But, in fact, I couldn't give it away.
So when the Doll House appeared on the scene, I was pleased to find a need for the second simulator. Except I didn't think the heat lamp and fan idea would be practical for the stage setting. Here's where one of my trips through Lowe's paid off. I had noticed a display of brightly colored bulbs intended for party use: orange, green, red, blue, etc. And I realized that I could mount a red bulb and a blue bulb behind an ordinary white air register vent, and they would visibly convey the idea.
To contain the red and blue lights so that they, and only they, would come through the register, I built an enclosing box from plywood and 1x6s. I screwed sockets onto the top of the box, and wired each bulb to a short power cord, which plugged into the receptacles on the HVAC simulator. I ran all of the wires through the top, so that the bulbs could be easily replaced if they were damaged. (These were Compact Fluorescents - the only exception to my LED-only rule.)
Because I didn't actually design the box on paper, I had to build it twice. The first version didn't account for the framing behind the wall. But even that wasn't terrible - it just took time I could have been spending elsewhere. (Like painting the inside of the box white. I thought that would make the effect work better, but I just ran out of steam and patience after having to rebuild the box, so it didn't get painted. Fortunately, it worked fine anyway.)
The garage door opening system probably gave me the most trouble, with three separate issues.
The first was the motion-activated light. That is a cool safety feature in an actual garage, but the way I positioned the opener meant that the light turned on anytime anybody moved within sight of the controller. That was not only distracting but confusing, since the act of opening the door also turned on the light. There is apparently no way to disable it, so I finally fixed it by taping a 3/4" PVC pipe cap to it. Note to self: tape was probably not the best choice. But at least it made it to the big stage before falling off and disappearing somewhere on the way home.

The second garage challenge was the tilt switch. Because the Digital Life controller uses the tilt switch to confirm that the door has successfully changed state, its correct operation is critical. My solution was fairly simple, perhaps too much so. To cover up the moving parts of the opener (both for safety and to minimize distraction), I built a cover. To implement the tilt switch, I simply cut a 2" by 2" square section out of the cover and attached it with a hinge. Then I only had to affix an arm to the back of the little door that would tilt the little door as the garage door rose, and affix the tilt switch to the front of the little door so it would, well, tilt.
It sounds so simple. I was concerned, however, that, with the tilt switch weighing down the front, the little door wouldn't close by itself. So I sketched up an arm with a bulbous end, to add weight. Perhaps because of hubris, or because the rest of the project had gone so well, I didn't even take any measurements. The bulb was entirely too big. The garage door wouldn't even open - it got jammed on the "bulb."
So I re-designed it after looking at the clearance requirement. This version was more angular. And it did allow the garage door to open. But it wouldn't pull the little door closed. So I took it off, drilled a hole in it and added a 1/4-20 bolt, nut, and washers to weight it down. With this modification, it worked about half of the time - not quite predictable enough for prime time.
I looked around my shop for some sort of spring or tubing that would give it the final push, but the only thing I could find was a piece of rubber insulation stripped from the SJ wiring cable. I attached it with a #4 wood screw, which allmmmooosstt worked, except that the rubber tubing tended to turn sideways around the screw.
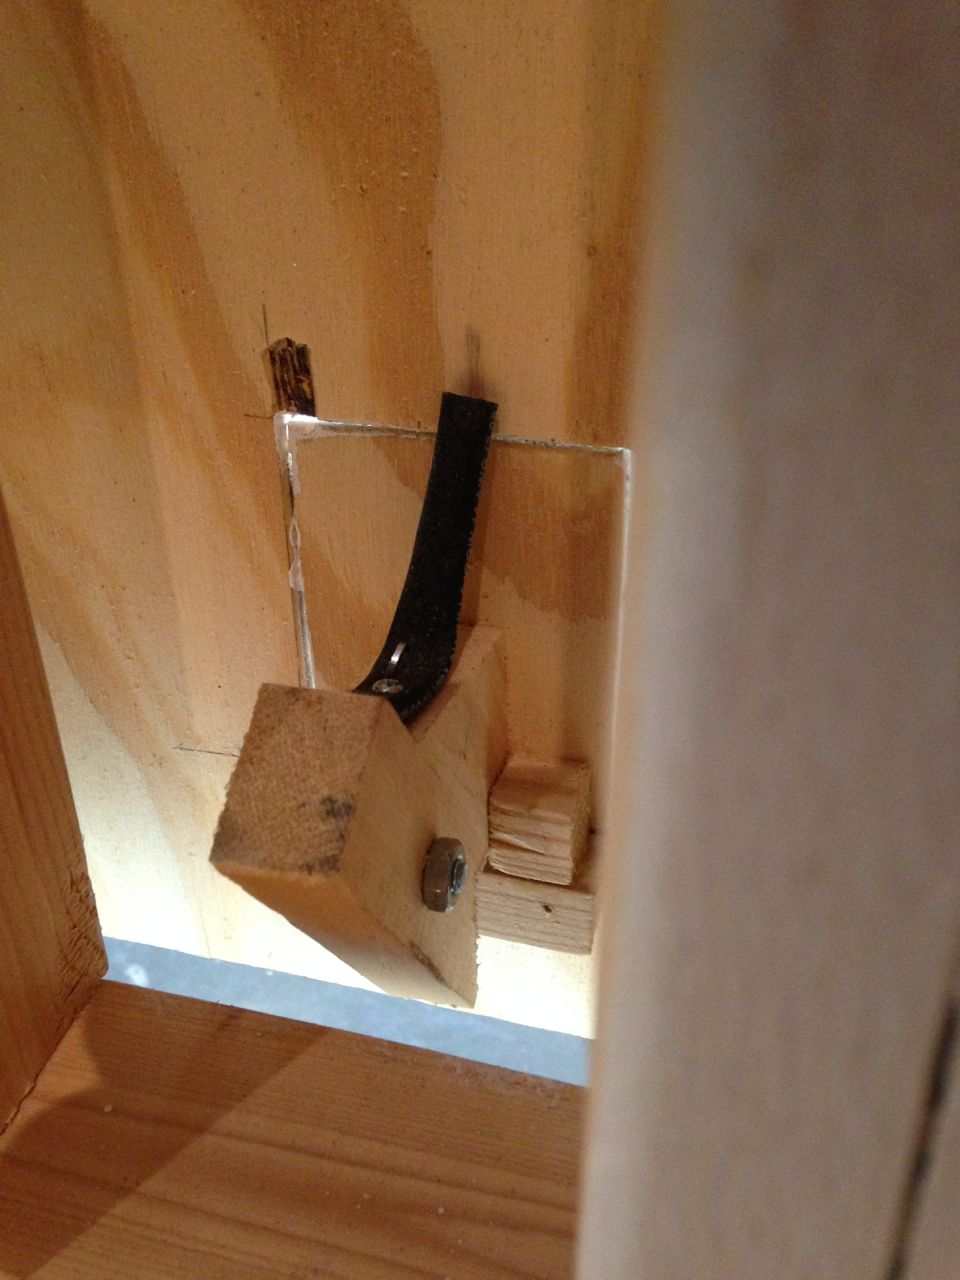
Finally, growing physically and mentally weary, I grabbed my staple gun and affixed the tubing firmly to the arm. And that's how it went to Vegas. I kept thinking I would clean up the implementation, but it kept working, and more important things took priority. The next time I gave it a thought was during the Developer Conference when one of the teams used the garage door in their application. Much to my relief, it worked.
But that wasn't the end of the garage door shenanigans. When I finally got around to reading the installation instructions for the garage door controller, I discovered that it was not sufficient for the tilt switch to just "tilt." Oh, no. It had to tilt more than 45 degrees to notify the controller. This time I did do some measuring, and a little trigonometry, to calculate what angle wedge I needed to pre-tilt the switch sufficiently.
Once I did that, the garage door tilt mechanism was fully operational!
But one more garage door gotcha lurked in the shadows. I had tried to connect the controller to the opener circuit, but it didn't seem to work. I made a mental note to take a closer look, and turned my attention to other matters. When the ship date began to creep up on me, I e-mailed some of my Digital Life contacts about the problem. They assured me that it should work.
But it didn't.
Here's my analysis. A regular old garage door pushbutton is just that - a single, normally open, mechanical switch, connected by two wires, just like a doorbell button. But the pushbutton on my Genie entry-level opener also included the capability to control the light from the pushbutton, and to lock the pushbutton to prevent (presumably tall) children from opening or closing the garage door. And it accomplished this without adding any additional wires. So that means that the circuit to which the pushbutton connects must have some additional circuitry to detect these additional functions.
I did verify that simply connecting the two pushbutton wires together does control the garage door, as expected.
Turning our attention to the Digital Life controller, it comes equipped with a two-wire cable that is to be connected to the same terminals as the pushbutton. But when I connected it as instructed, not only would the controller not control the garage door, neither would the original pushbutton.
I measured the resistance between the two leads from the Digital Life controller, and the measurement was not infinite (as an open contact would be), but finite, suggesting to me that they had implemented the controller with a solid-state switch, not a mechanical relay. That is certainly a more reliable way to implement it, but only if it actually works.
I don't know why it didn't work on the Doll House. Perhaps the wire runs are shorter, which might cause a problem if the circuit assumes there will be a certain amount of voltage drop.
But regardless, it didn't work, and I was not going to get any help before time to ship the Doll House.
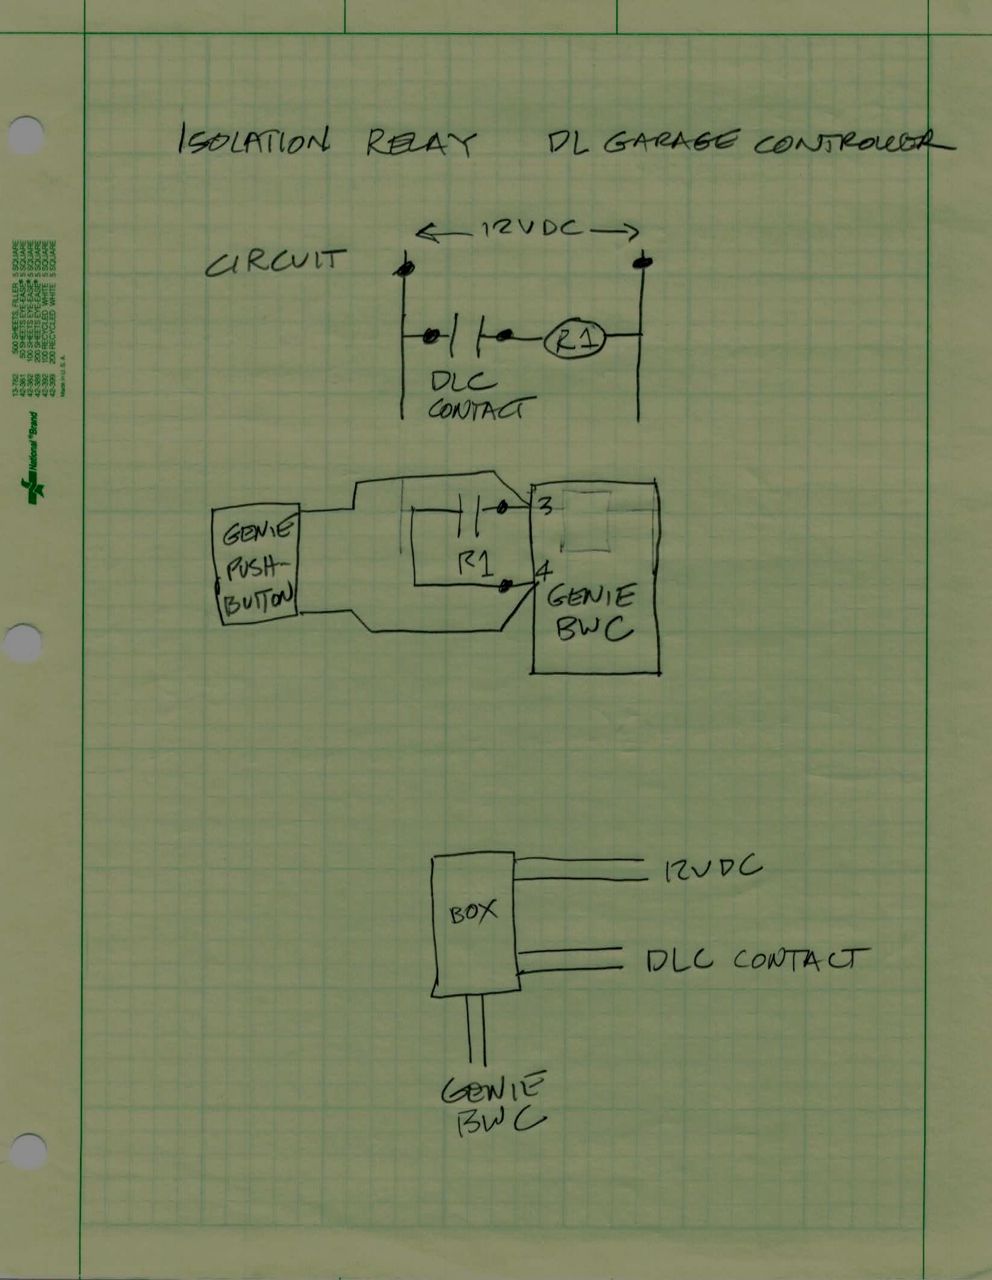
I decided to install an actual mechanical relay between the Digital Life controller and the terminals on the Genie opener. Fry's is about 25 miles form my house, but I had to go right by it for some other reason (playing music, I think), so I picked up two relays, a circuit board, and a plastic enclosure. I wired it up that afternoon, connected it, and behold, it worked!
Now, finally, the garage door opening system function properly, and just in the nick of time.
Back to Nov 14 Back to Dec 3 Back to Dec 28
This one didn't exactly sneak up on me, I just kept stalling, because I was worried about the solution I had in my head.
Early in the design and construction phase, I calculated the likely weight of the finished Doll House, and actually weighed a few pieces to see if I was on the right track. I figure it would weigh around 350 pounds. Not frighteningly heavy, but too heavy to pick up with one hand. Or two.
I needed to pick it up to attach the bottom plate, which I had already measured, cut, and stained.
I also needed to be able to gently turn the folded Doll House onto its back, so I could roll it out the garage door for loading. (The original design showed it lying on its side, so it could pass through a 36" door. But it turned out that there were wide doors available everywhere it had to go, so it rode on its "back.")
I briefly considered just acquiring some additional helping hands to strong-arm it as needed. But I was pretty sure I would need to raise and lower it multiple times, which doesn't work so well if you have to wait for other people every time you need to move it.
Plus, I was looking forward to the challenge. Sorta. I confess, on more than one occasion, I dreamt that I was trying to flip it over on its back, and it started to fall on me. Or I was trying to lift it and it turned out to be much heavier than I thought. Or that the frame fell apart because I was trying to just lift it from the top. All sorts of disasters haunted my dreams, and even some of my waking hours, too.
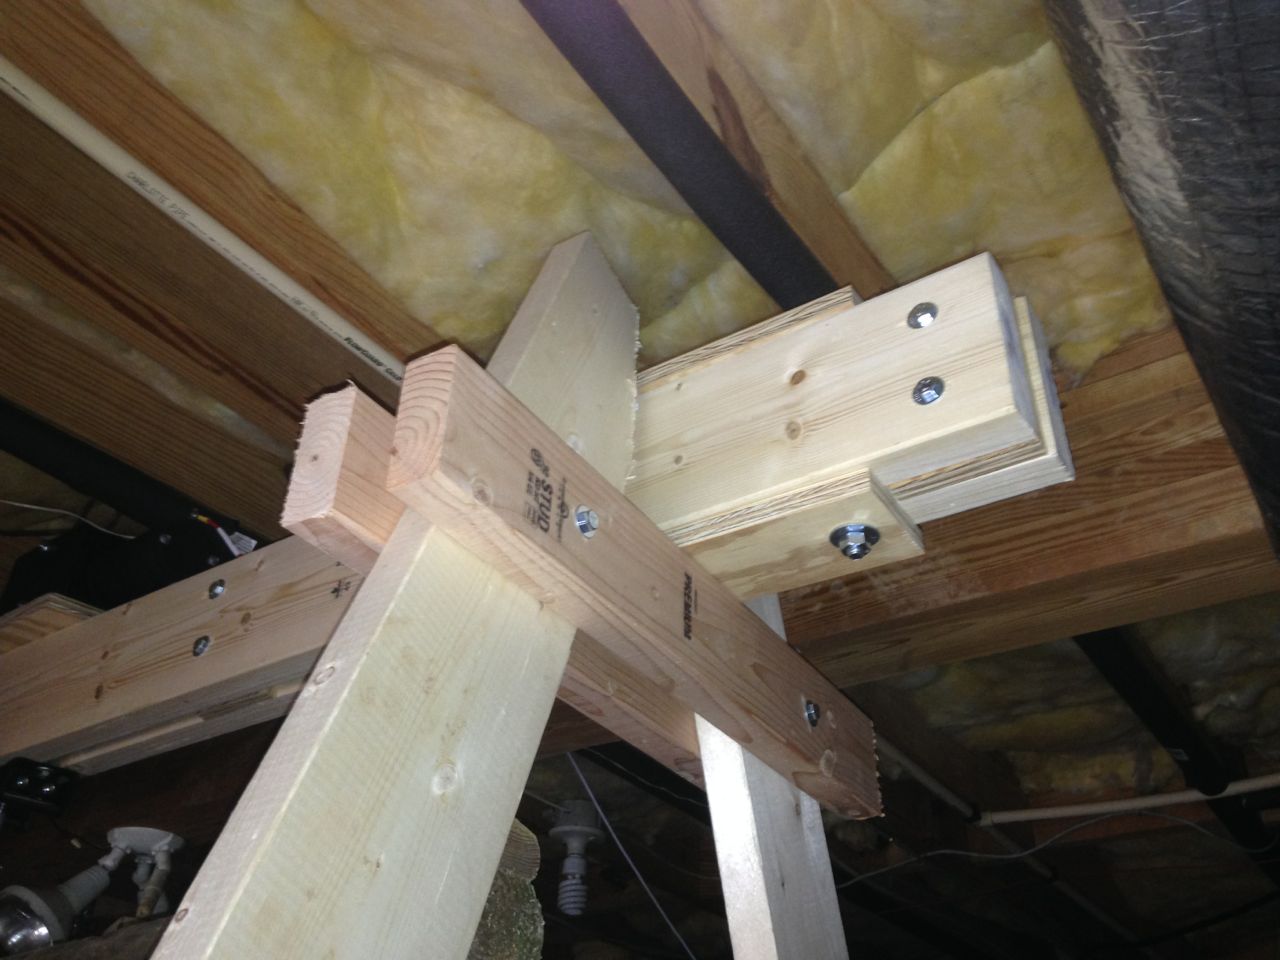
Finally I decided on a solution, and started to sketch it out. I would build a wooden A-frame with a crossbeam, and attach an automotive-type, bumper-mounted winch to the crossbeam, and use that to lift it.
I tried to over-engineer wherever possible. I asked my Civil Engineer daughter how much weight a 2x6 would hold over a ten-foot span. She said that 600 pounds seemed like a reasonable amount based on the table she consulted. So I use two 2x6s. One reason I used two was that I wanted the lift cable to be centered on the beam, but I didn't want to drill a hole in it. By sandwiching plywood spacers between the two 2x6s, I would create a slot through which the cable could pass. I also felt that the additional width would add stability.
I used a similar approach to design the rest of the A-frame. The only piece I left off in the end was a middle brace. I decided it wouldn't be necessary, and that the rest of the structure was sufficiently over engineered.
I made the assembly as tall as I possibly could, just so it cleared the joists. (Yes, I briefly though about just attaching the winch to the joists, but in the end I was concerned that the attachment might pull out, ot weaken the joists, or cause my bedroom floor to sag. So I went with the independent A-frame design.)
It was relatively easy to assemble because I built it around the Doll House. I was able to use that 7-foot-tall monstrosity to support the crossbeam while I assembled and bolted the legs in place. (As of this writing, I still haven't figure out how to disassemble it.)
So now I had an A-frame and a winch. I turned my thoughts to lifting the Doll House itself. I considered a big loop all the way around it, made either of rope, or cloth strap, or even chain. But I was afraid that would squeeze it too much. I tried to think of other approaches, but only one really made sense to me.
I decided I would attach a U-bolt to the bottom of each side of the center section. Then use a chain from the U-bolt up the side of the structure to another beam which would serve as a spreader.
Coincidentally, I already had a beam that fit that description. I had used it during a particularly challenging dock recovery, described in painful detail here. It was slightly over 4 feet long, had a lifting eye attached at the center, and even had some 2x2 guides that would work for the chain.
As I recall, I went to bed that night fairly confident in my design, then awoke in a cold sweat. As I was mentally using the winch to turn the Doll House on its back, I could see that it would try to slip the chain and simply fall over backwards. The only way I could get back to sleep was to add two more U-bolts to the design, at the top of the Doll House, to which the upper portion of the chain would attach.
After that lengthy explanation, the assessment of the design turns out to be fairly short. It worked. I was able to lift the Doll House straight up, and nothing broke or collapsed (although I was standing clear when I first lifted it). I attached the bottom plate with carriage bolts, and lowered the Doll House back to the floor for final touch-up.
And when Don came over to help me turn it on its back, that also worked, with approximately zero inches to spare. But that was enough. And as we lowered it back, it did, indeed, try to slip through the chains, but the upper U-bolts held firm.
I mentioned in Doll House Intro that I had to add some devices to the Doll House when it became associated with Digital Life's "Penguin" API. I had already included most of what they planned to feature, but one requirement was a bit of a challenge. Their equivalent of the Pi House was called the Igloo (because, Penguin. Duh.)
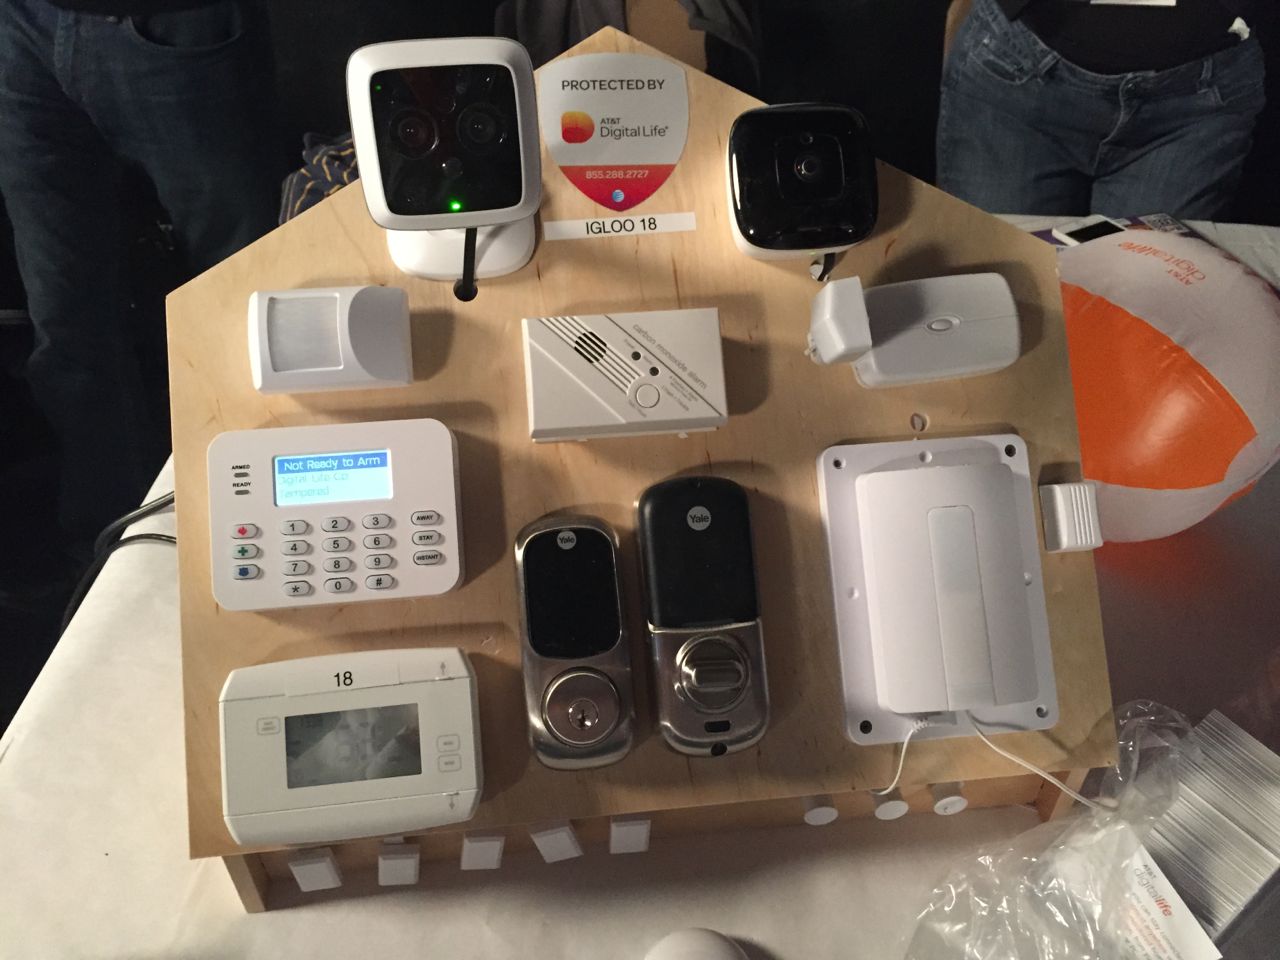
The Igloo featured eight magnetic contacts across the bottom. And I thought long and hard about how to support eight magnetic contacts on the Doll House in some workable manner. One of my best ideas was to make a tool storage pegboard on the garage door cover. It would feature wooden tools and their silhouettes. Each tool would have a magnet attached, and each silhouette would have a corresponding magnetic contact. There would be a small box at the bottom to hold tools which had been removed.
I thought it was a cool thing to be able to use Digital Life to keep track of your tools. But I eventually decided that wasn't a good idea for several reasons. First, it was complicated, and I didn't really have time to build it before ship date. Second, I was afraid the tools would get lost or mislaid during the Hackathon, since I didn't plan to restrain them. Finally, the tool idea unnecessarily constrained the developers to a specific application, which was not good.
It was not until after the Doll House had been shipped, and our family had celebrated New Year's Eve and Day that I figured out what to do.
I decided to mount eight wooden circles on a rectangular piece of plywood. The circles, which I cut out by hand using a band saw, were each attached by wood screws that allowed the circles to rotate. Each circle had a flat spot where a magnet could be attached, and room adjacent to the circle to attach the magnetic contact.
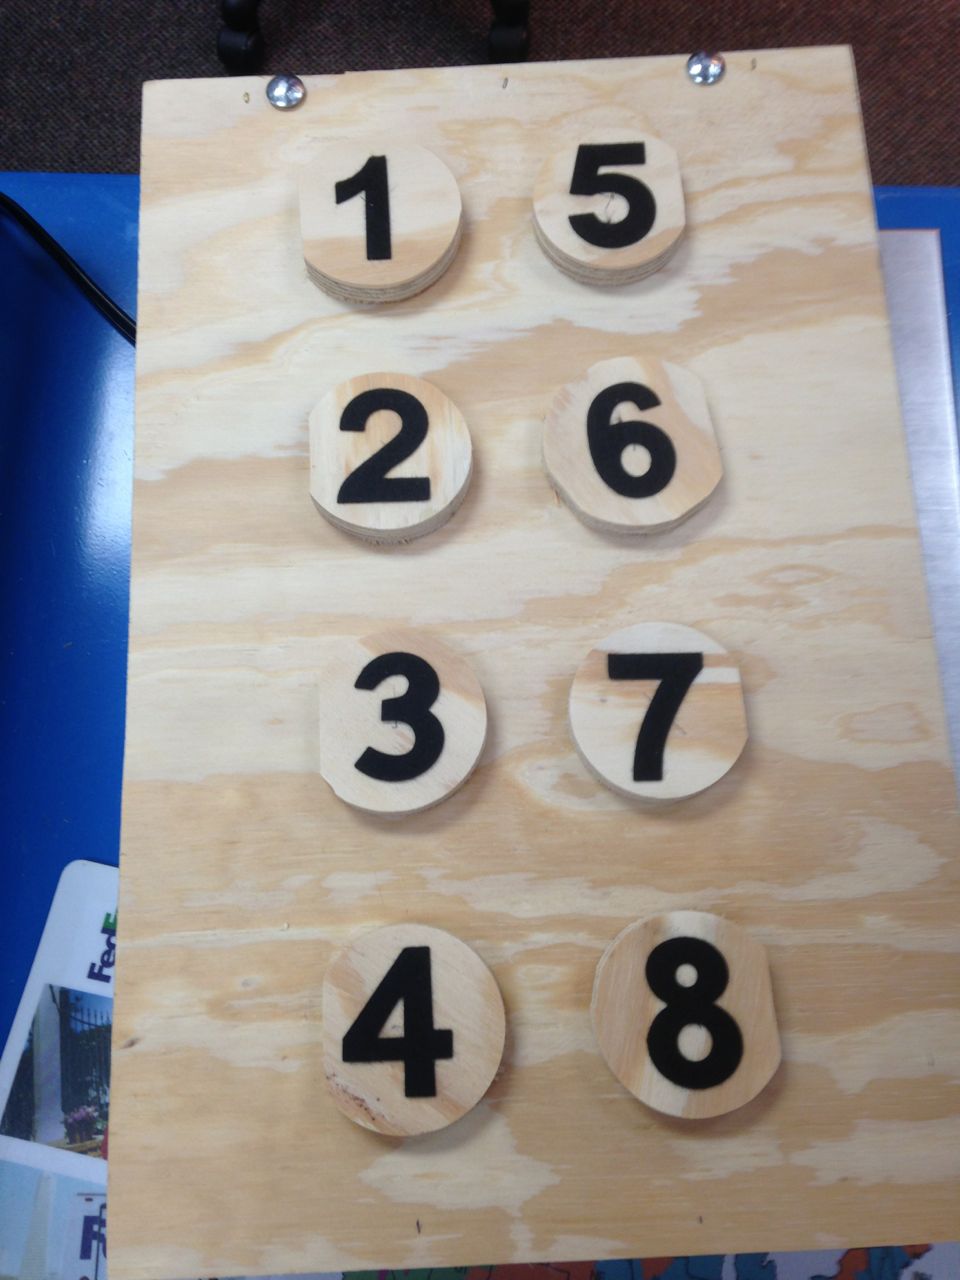
To visually display the status of each contact, I stuck large felt numbers to each circle, 1 through 8. When the numbers were vertical, the contact was made, and when the numbers were turned in any way, the contact was broken. (Fortunately there was no number 9 to be confused with an upside-down 6.)
I built the board in less than two hours, and shipped it overnight Saturday Delivery from Gainesville to Las Vegas. (Don't ask. But it was not cheap.)
On Saturday morning, I opened the Digital Life web interface to see if I could see anything through the Doll House video cameras. Imagine my delight when the first camera I clicked on showed me the Circular Contact Management System, hanging in place on the garage door mechanism cover, just as I had intended.
When Don returned, he showed me a video of one of the applications that used the contacts. It was a game featuring a zombie attack in which the person playing the game used his home automation system to react to instructions given by the Zombie Defense Authority. "Close all the windows and lock all the doors." "Open all windows because the house is about to be flooded with poisonous gas." That sort of thing. And Don's video showed the fellow playing the game by pushing buttons and, yes, turning circular knobs.
Cool.
As I described in the Intro there turned out to be two development environments, the "Pi House" and "Igloo." The Doll House was originally designed for the use with the Pi House environment.
As the Conference drew nearer, the Igloo team began to look for a similar way to allow developers to demonstrate their applications on a larger scale. Their primary candidate was a trade show system they had access to. However, this system measured 20 feet by 9 feet by 9 feet, and required a fair amount of assembly to set it up and take it down.
Eventually the event planners made a decision. The developers would develop against the Igloo, but finalists would use a Foundry tool built by Mike to point their apps to the Doll House, initially on the stage in the Rain conference center, and eventually in the Pearl Theater at the Developer Conference Keynote presentation.
So the requirement to be readily packed, moved, and set up proved to be a useful requirement.
My original plan was to finish building and painting the structure, attach all of the devices, then move structure from my shop to the Foundry so the team could get familiar with set up, tear down, and use. I even intended to make a short film of the set-up and packing process. But when I learned that a team from the Foundry would be on site, that didn't seem quite as necessary.
As mentioned in the main article, very late in December, I realized that, despite all the e-mails I had exchanged about paint, logistics, size, and logo placement, no one had actually told me when it had to be finished. So I woke up early on the 26th and looked up the Developer Conference on the internet. Imagine my surprise when I discovered that the conference was scheduled to start in only 8 days, a duration which spanned New Year's Eve and New Year's Day. And included two solid days of driving cross-country.
So I inquired what arrangements had been made to pick up the Doll House. As it turned out, the answer was, "None." Somehow that part of the process had fallen into a crack.
Shipping the Doll House from my shop made the most sense, although the fact that it was a residential area turned out to potentially be problematic.
Monday morning, I began exchanging e-mails with Freeman, the trade show company who was responsible for managing the Doll House in Vegas. Over a somewhat amusing exchange, they first said it was going to be difficult to find a way to ship it in time, then they called me by phone to ask whether a tractor trailer would fit in my neighborhood. They reminded me that most trailers nowadays are 53 feet, so don't even be thinking about a little old 40-footer. I assured them that we could handle a 53-foot trailer, crossing my fingers as I did so.
I also took advantage of the phone call to remind them that we were talking about a box that is 7 by 3 by 4 feet, and that I had at one point volunteered to drive it to Vegas in a rental van, an offer which was never even acknowledged, much less accepted.
Eventually they told me that they would be sending a "Sprinter" van [picture?], and the driver would arrive at 10:00 Tuesday morning. Also that they would send me a bill of lading with their company name as the shipper, since their shipping companies didn't really like making pickups in residential areas. (Wha?)
Don came over on Monday afternoon to button down some wires while I did the last remaining required steps. Together (with the winch) we managed to safely migrate the Doll House into prone position, ready for shipping.
The truck driver actually showed up at 8 AM, much to my spouse's surprise. In a former Ryder/Penske straight truck. And speaking only Moldovan.
I called Don (who lives about 10 miles away) to ask him to come help load. While we were waiting, I tried several times to offer coffee to the driver. It finally worked when I poured a cup and handed it to him. He sat in the sun room and petted Jasper.
After he finished his coffee, he started to back his truck down to my basement, but I had to signal him to wait until I moved my van, which was previously queued up to take the Doll House down to the Foundry, until the plan changed.
From there, it went surprisingly smoothly. Don and I rolled the Doll House out of the basement to the back of the truck. The three of us lifted the front and set it on the truck deck, then lifted the rear and slid it into place. I gave the driver a couple of 2x3s I had around to place under it; we slid it securely against the front of the truck, and he carefully and securely strapped it down. We threw in a storage container with spare paint and all of the paper device documentation I could find, and also tossed in the 4 furniture dollies I had just bought. The driver also strapped that stuff down, and got ready to leave.
At this point he needed a Bill Of Lading, but I had not received one yet. (It turns out that it was caught in my overly-aggressive corporate spam filter.) So I filled one out by hand, made a copy, and waved goodbye to the Doll House. (You can see the two BOLs on the scanned documents page.)
Back to Dec 26 Back to Dec 29 Back to Dec 30
My primary purpose in writing this down was to capture the smaller details before they slipped from my memory, and (as usual) for my own entertainment. I also thought it might be of interest to a few friends and family members who suffer fits of creative insanity similar to mine. I am under no illusions that this was a Significant Project, or Important Work, except to me. I'm writing about it because I like writing, and because it helps calm my brain as I empty it of these thoughts.
The project took a large portion of November and December, 2014. I am often tempted (as perhaps are others) to think of it as simply a rudimentary building project, especially when compared to writing software, or designing a smart-phone application. But then I think of the various interworkings and interplays that informed the design, the effects of things I have learned, not only in construction, but in wiring, and in the application of Digital Life devices over the last few years, and I think that there is actually a little more to it than that.
I started this document as a brain dump, just typing the things I remembered. At 19 pages (10 point, single-spaced), it was unmanageable.
After several weeks, I had to get serious, and finally decided that the Timeline would be my friend. I was right. And, yet, it has still taken me weeks to finish this. Too long for anything except a hobby.
FYI, since a Colophon is usually about production details, I generally edit my postings on a Mac Mini using TextEdit and emacs in Terminal, depending on what I need to do.
And one last thing: while I was preparing this posting, I discovered Apple's DigitalColor Meter, which shows the RGB values for any selected point on the monitor screen. For year's I've opened up a graphics editor to sample a color. How have I missed this little gem? BTW, I used it to match the colors of the web page to the colors of the Doll House, in case you were wondering where these sharp theme colors came from.
Thanks for reading.