Dock Physics
A lugubrious tale of patience and perseverance
Dock PhysicsA lugubrious tale of patience and perseverance |
|
The week of Thanksgiving, 2013, brought a couple of days of strong, gusty winds. They shoved my dock around more than usual, and provided an interesting challenge to one of my new "hobbies," dock management. (I mentioned some of my early dock experiences in a previous post here.)
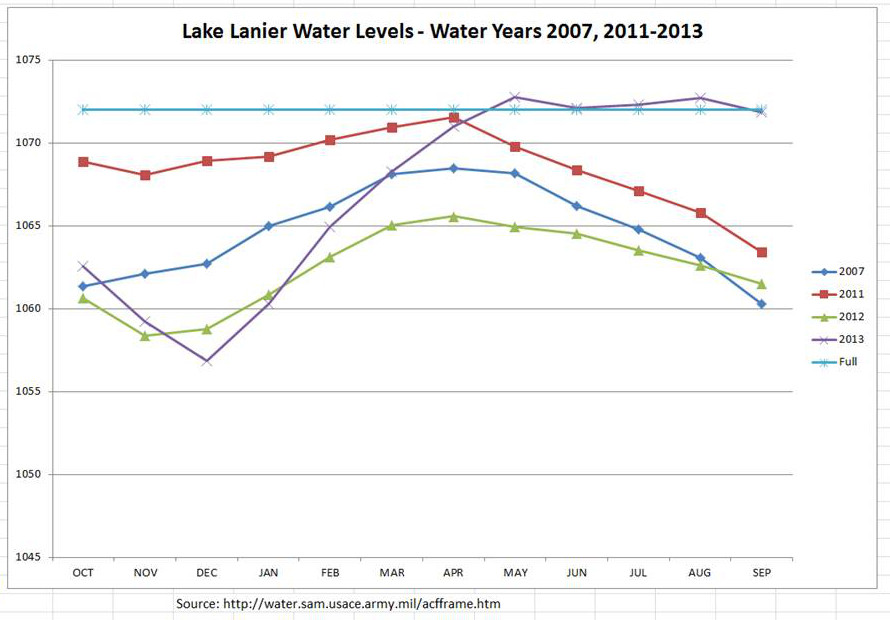 Lake Lanier is about 20 miles long, with 692 miles of shoreline. For lots of reasons, the lake level typically changes rather significantly over the course of a year, as much as 10 to 20 feet as shown in the chart. (You can click on any image to see an enlarged version. And you can find more information about the lake and water level management here).
Because of this variation, lake docks must not only float, but they must be moved out and in relative to the shoreline to avoid being grounded as the level drops, or inaccessible as the level rises, respectively. They also must be tied down somehow to withstand winds and waves.
Lake Lanier is about 20 miles long, with 692 miles of shoreline. For lots of reasons, the lake level typically changes rather significantly over the course of a year, as much as 10 to 20 feet as shown in the chart. (You can click on any image to see an enlarged version. And you can find more information about the lake and water level management here).
Because of this variation, lake docks must not only float, but they must be moved out and in relative to the shoreline to avoid being grounded as the level drops, or inaccessible as the level rises, respectively. They also must be tied down somehow to withstand winds and waves.
Coastal docks, which are subjected to ocean tides on a daily basis, are equipped with rugged, time-tested hardware and anchoring systems. In contrast, lake docks are more likely to use ad hoc rigs, whose emphasis is on minimal cost rather than robustness or ease of use. In addition, the variability of the lake level exceeds most coastal tide ranges.
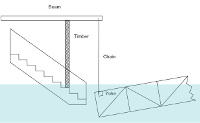
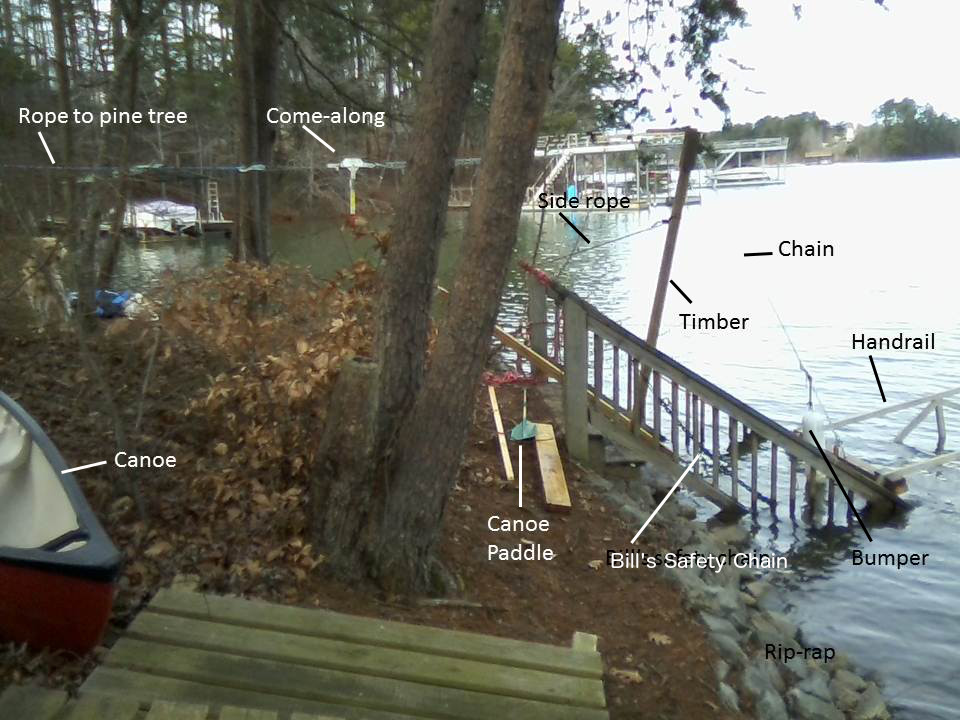
My dock uses a rather common system consisting of two hand winches mounted on pipes driven into the shore, with a cable from each winch attached to the near corner of the dock. These cables hold the dock, specifically, its access ramp, against the shore, or something firmly affixed thereto. The ramp, in turn, pushes back, keeping the dock from running into the shore. When all is well, the forces are balanced. (Click here for more winch explanations and photos.)
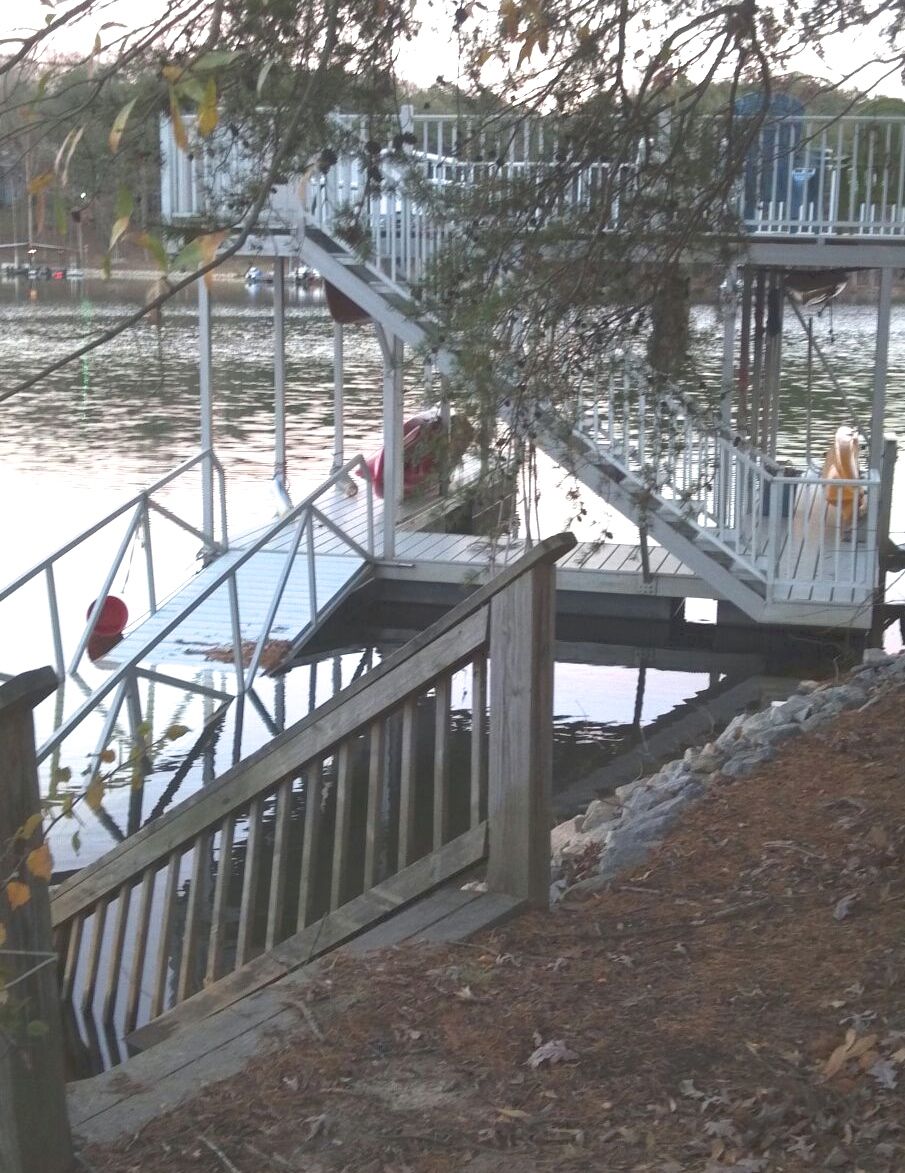
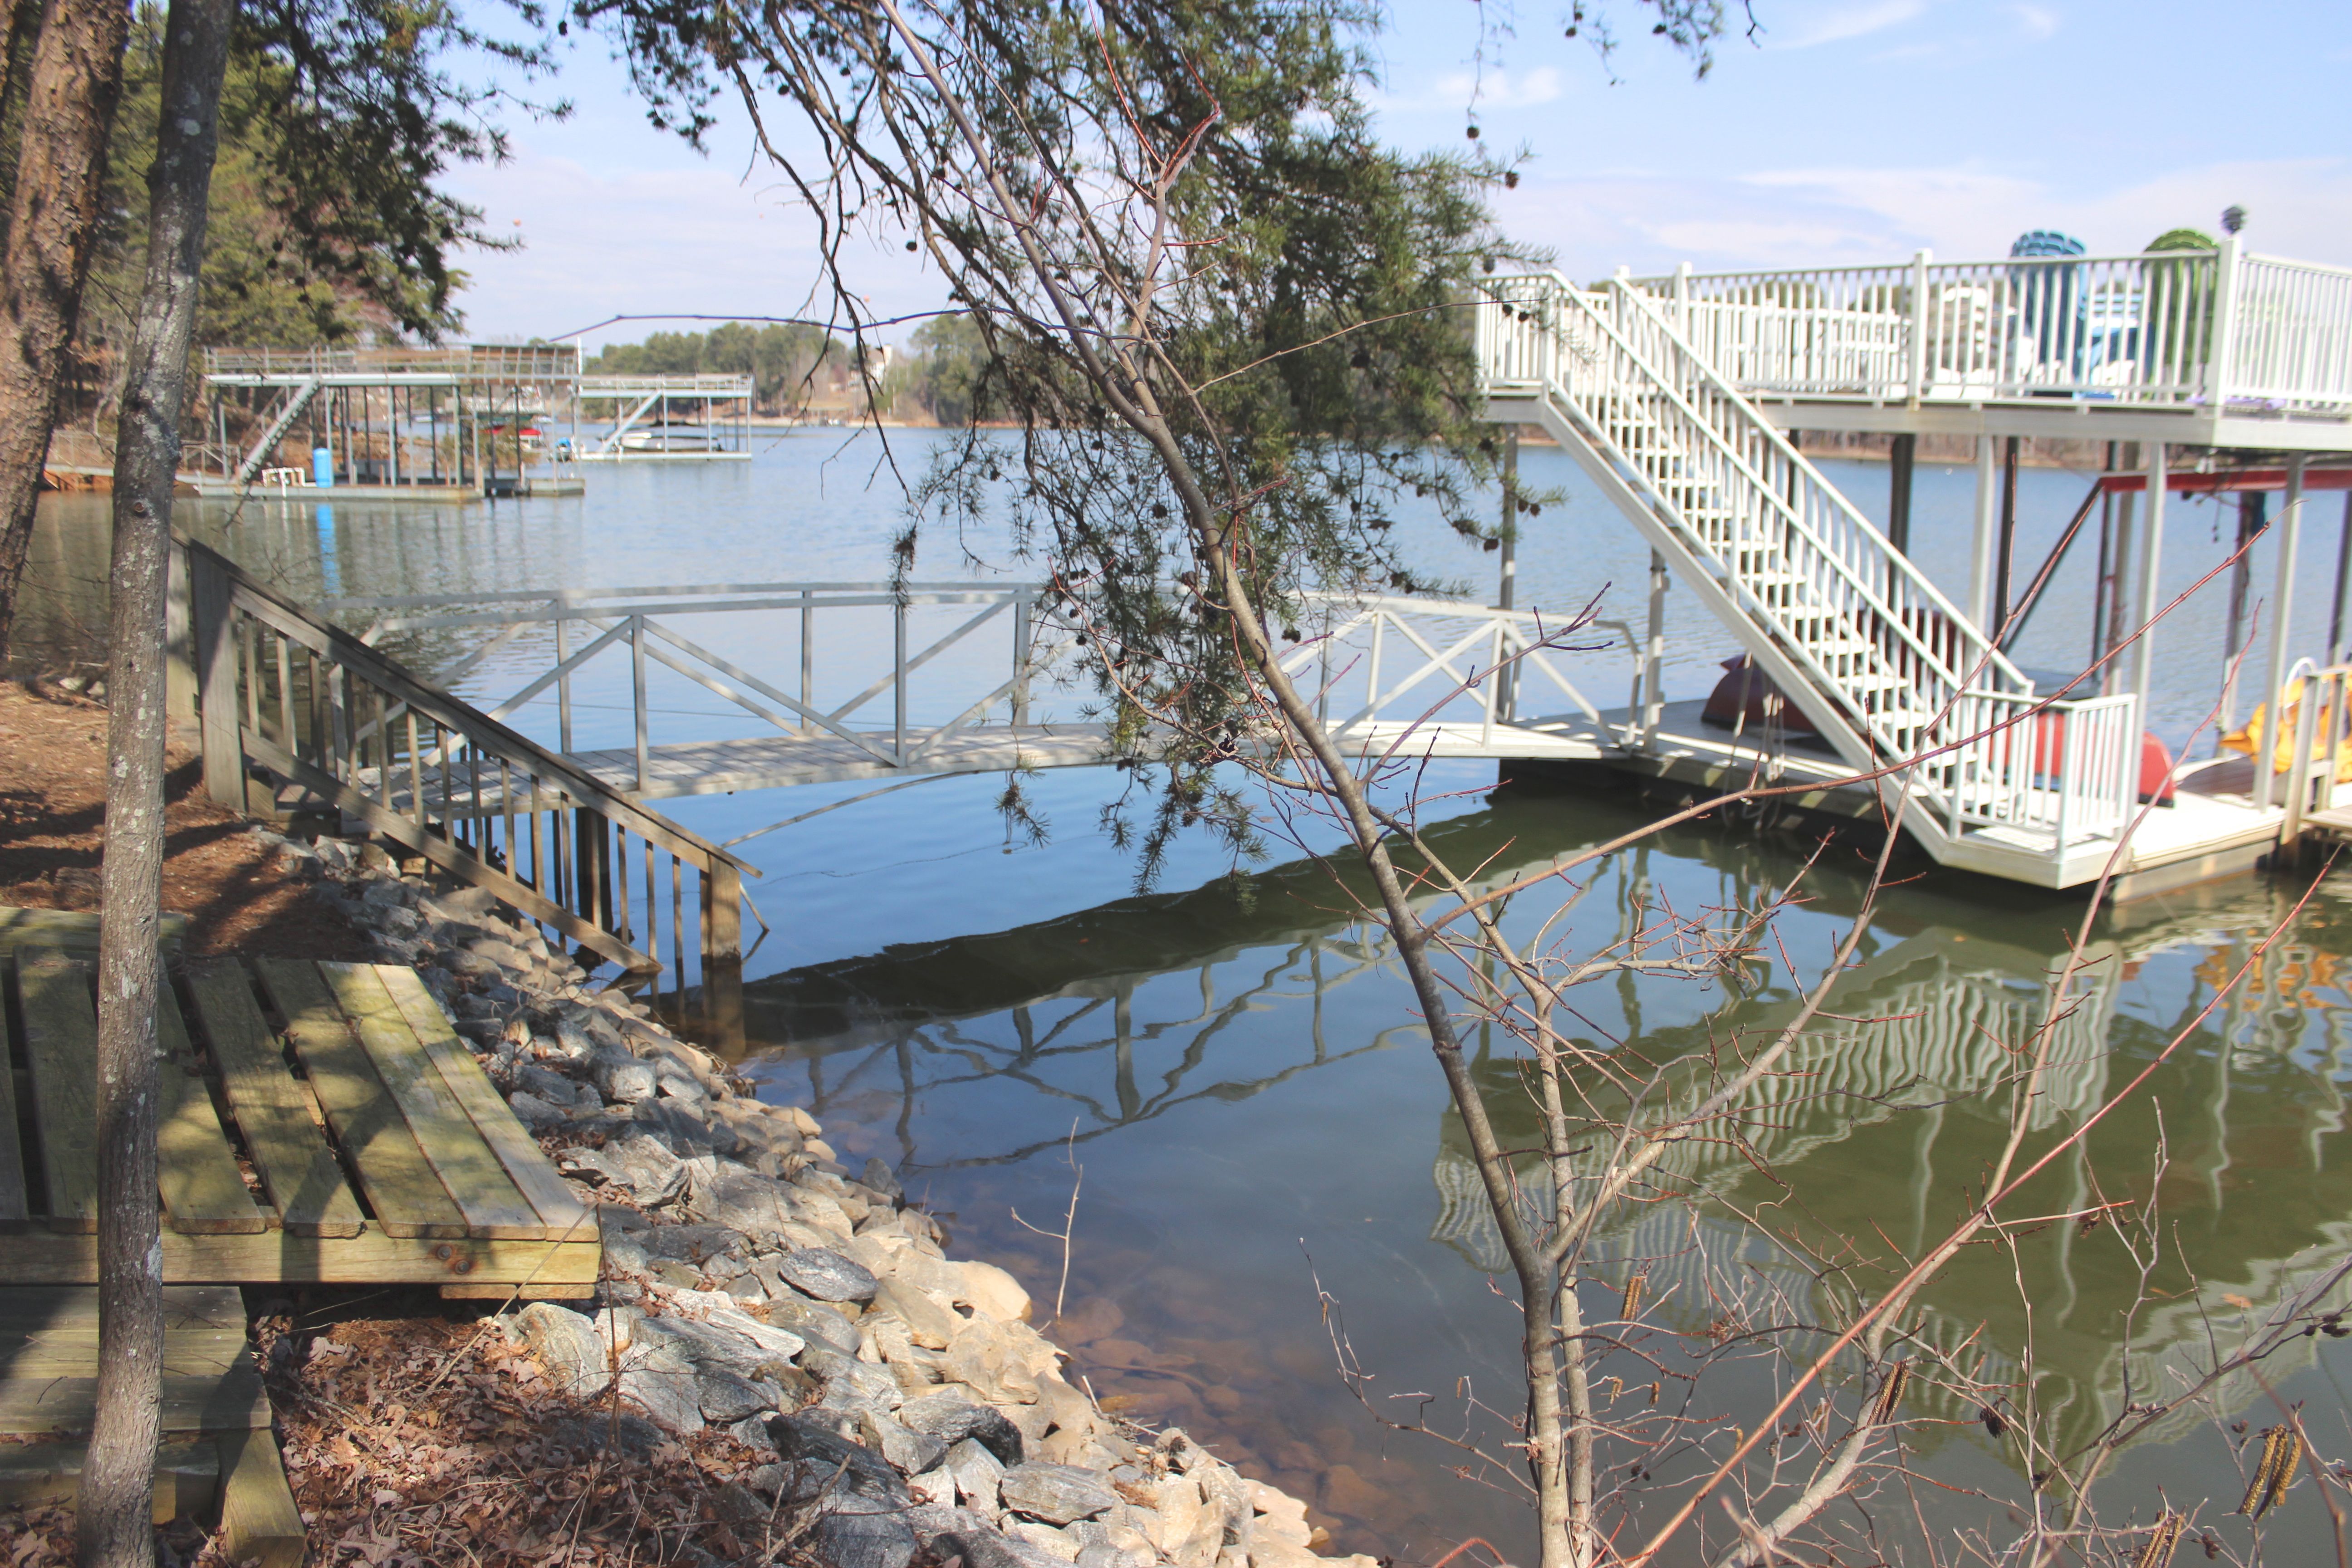
Under normal conditions, the dock is positioned as shown in the drawing and sky-view photo, below:
 |
 |
| In the sky view picture above, note that the left cable is offset less than the right
cable due to the curve of the shore. If the left cable gets sufficiently
loose, and the wind blows from the open side of the cove (the prevailing direction), the cable can slip over the handrail, no longer
holding the dock in place, and allowing it to swing around against the shore.
In my short history with the lake, this had only happened when the level was
low, and the ramp was resting on the clay lake bottom.
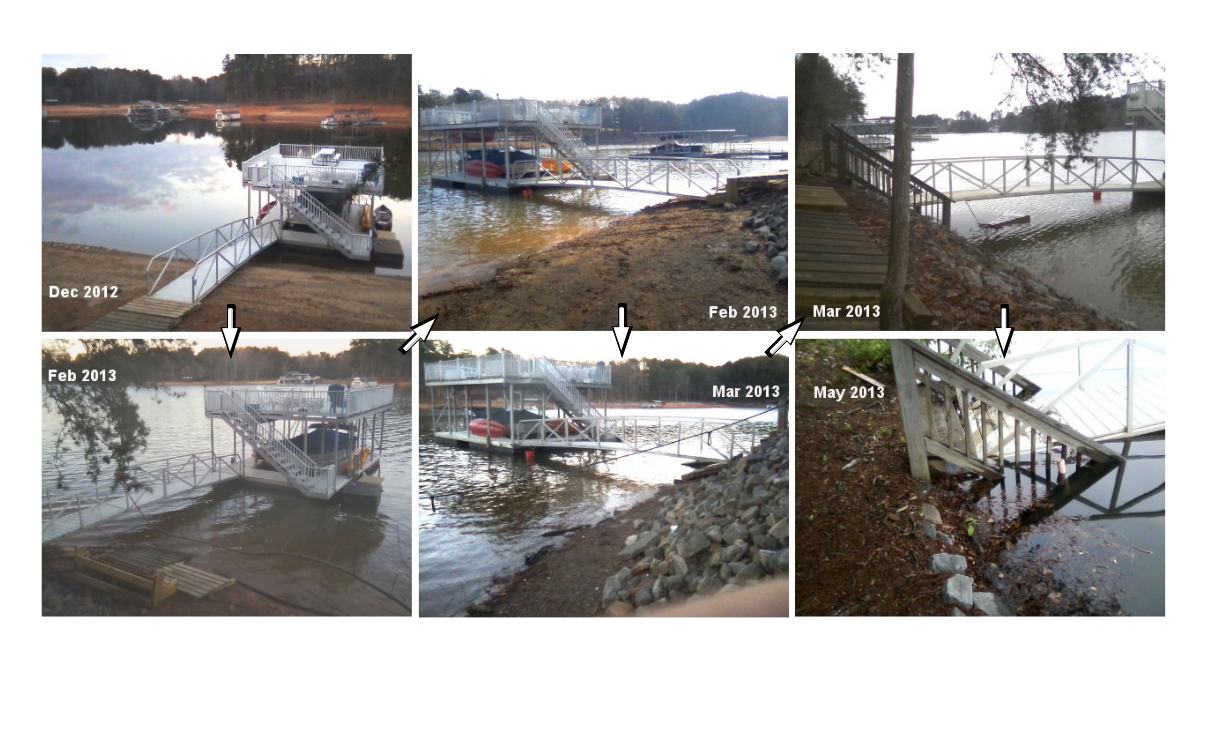
The image to the right shows several different views over a particularly active 5-month period. In the middle pair of photos, notice where the water is compared to the rocks. In the right pair, notice where the ramp is on the steps, and that it is under water on the lower right. |
 |
For reference, I estimate that the ramp weighs about 400 pounds, meaning that lifting one end requires about 200 pounds of force. I can't lift one end by myself, but Ben and I together lifted it once fairly easily. (As research, I looked up a similarly-sized dock in an internet catalog, and it listed the weight as 760 pounds, but the hand rails were considerably stouter. I'm sticking with my 400-pound estimate.)
As you can see from those pictures, I've had some experience moving the dock in and out over the past few years, so I was getting pretty confident in my ability to handle most anything. But on that fateful day before Thanksgiving, several events combined to pose a significant challenge to that confidence. Since I wasn't there to see it happen, this is my speculation of the events, based on the information I have since gathered:
The combination of the loosened cable and the constant battering apparently caused the ramp to come completely off of the steps, and caused the dock to swing around to the shore, where it was bumping against the rip-rap ("large rocks") that line the shore.
My good neighbor Joe tied the dock to shore to minimize the pounding, then called me to report the situation. Another good neighbor, Bill, took some additional steps to secure the dock, including connecting a chain from the ramp to the step handrail, to keep the dock from slipping further out into the cove.
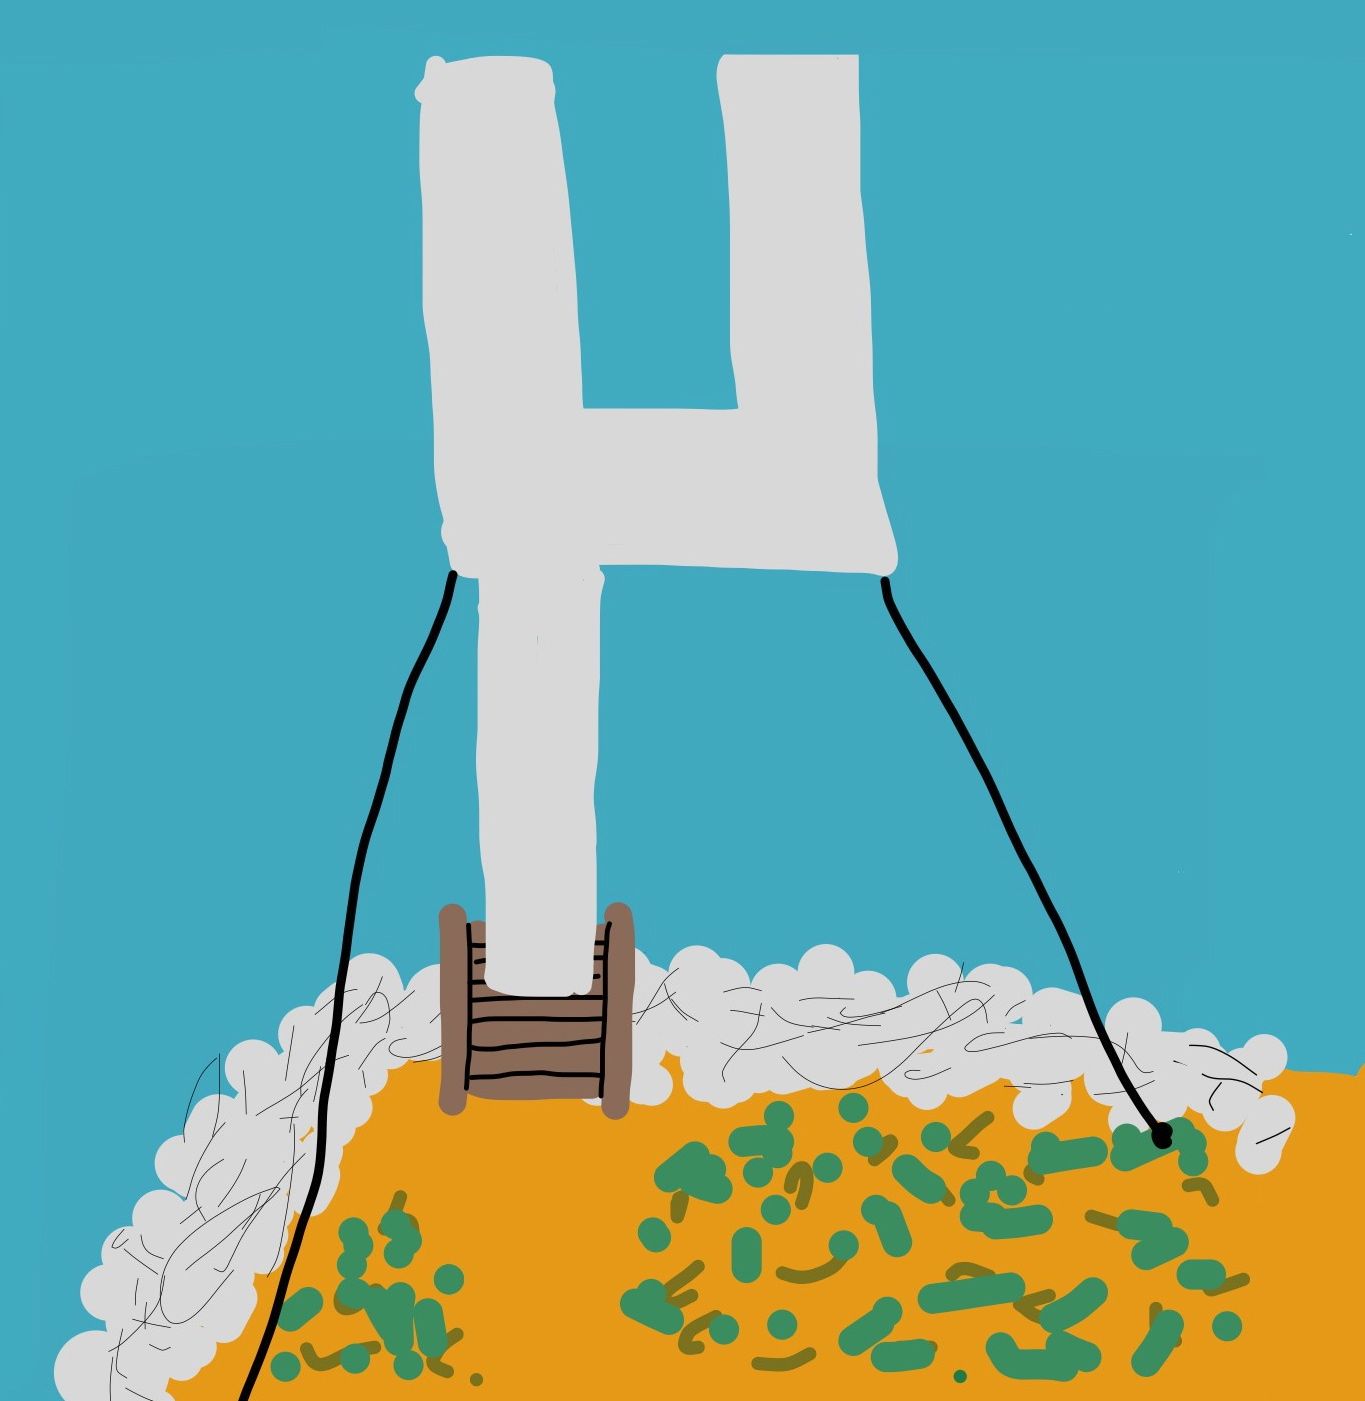
The drawing and photo below show the state of the dock when I returned home on the following Sunday.
 |
 |
It was a challenging situation, for sure, and I spent several nights awake, wondering how I would tackle the task of restoring the dock to its normal position. There are dock service companies with crane boats who can rescue docks from all manner of situations. And I seriously considered calling one. But I also enjoy a challenge, and thought I might at least give it a try.
I should note here that my Infinitely Patient Spouse had her infinite patience severely tested during this phase, but she maintained her sense of humor the vast majority of the time.
The first thing I realized (duh!) was that with the ramp in the water, I wouldn't be able to use it to reach the dock in the normal manner. And it was definitely too cold to be swimming. Fortunately, the wind had conveniently butted the dock up against the shore, so I was able to step onto it, retrieve my canoe, and bring it back to shore. I tied it to a tree to make sure it would be there when I returned, and decided that was enough work for one day.
It took a few days for the wind to die down (first rule of Dock Club: don't try to work on a dock when it's windy) but when it finally did ease, I attempted to straighten it out and get the cables aligned properly. For my first effort, I tried just standing on the shore, and shoving the dock out into the cove with a strout pole.
That had generally worked in the past, but with the end of the ramp under water, just shoving it was not sufficient. So I climbed into the canoe and tried pushing the dock with the nose of the canoe while I paddled. That actually moved it a bit, but the gentle breeze would push it back whenever I stopped paddling. Finally, I tried tying a line from the back of the canoe to the outside corner of the dock, and pulled it by rowing away from it.
| Between rowing and pulling, and a helpful shift in the breeze, I did manage to get the dock
back into its normal orientation. As the drawing to the right shows, the entry end of the ramp was now under about 5 feet
of water, making the canoe my only means of dry access. (I did consider
wading and swimming, but the low air and water temperatures discouraged that
approach.) |
 |
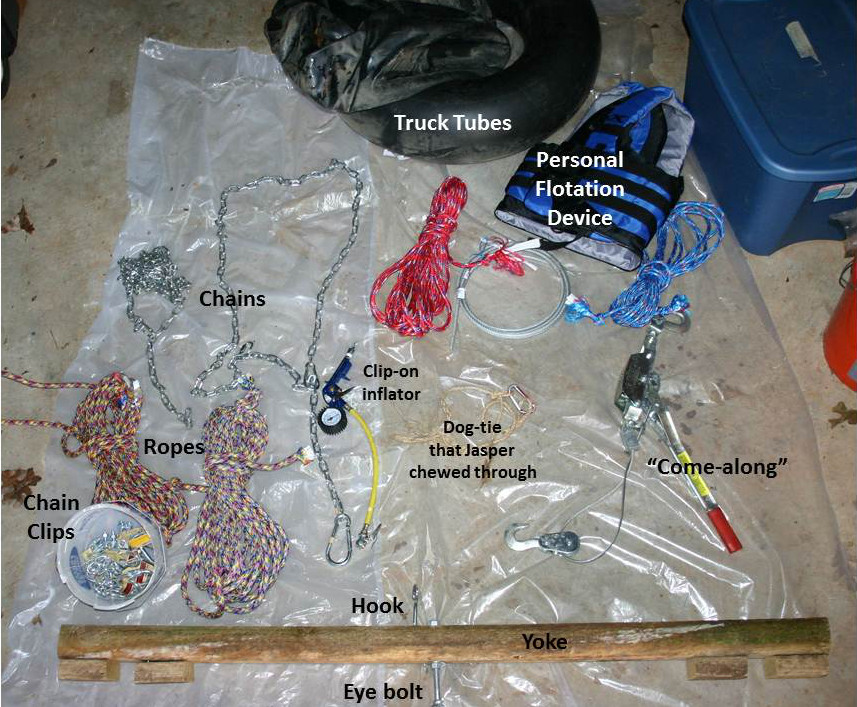
My first brilliant idea was to use air to lift it. Many of my neighbors have boat lifts that use air tanks to suspend their boats out of the water. So I acquired a couple of large truck tire tubes, and tried to inflate them under water. I figured if a tube would support me in the water, it should be able to generate 200 pounds lift. (There's a picture of the tubes in the gear photo, farther below.)
There were several problems with this approach. I really didn't have a good way to get the tubes under the ramp. (Remember, the end I needed to lift was still 5 feet under water.) I finally managed to stuff them under water near the middle of the dock by standing on the ramp, wading into the water as far as I could stand it, and using my hands to stuff them under the middle of the ramp.
Then the problem became how to inflate them. I rolled my large compressor down to the dock, ran an air hose from the shore to the ramp, and tried to use a clip-on nozzle bought for the purpose, but it turned out to be cheaply made, and wouldn't stay on.
I was finally able to use my normal inflation nozzle to get air into both tubes, but they produced absolutely no lifting motion on the ramp. I was at least hoping that they would offset enough of the weight to allow me to lift it myself. Not even close.
My next inspiration was the realization that the tubes didn't have to be under the entire ramp to provide lift, they just had to be under water. The hand rail at the entry point was only 2-3 feet under water, and I thought I might be able to build some sort of platform that would fit under the hand rails, and allow the tubes to get better leverage. Not a bad idea, but clearly one that would take a fair amount of construction.
About this time, my Spouse decided that she would have to abandon her idea of having the kids visit the dock during their Christmas stay. Fortunately, the raw weather reduced the impact of that loss.
The platform idea then led me to the thought that it might be possible to build a simpler "yoke" that would allow me to use some sort of leverage to lift the ramp.
And then I realized I had finally defined the real problem - there was no way to get a good grip on the handrail to lift it. Even if it had been summer, we (me and whomever I could cajole to help me) would be standing in 5 feet of water on rip-rap or clay, trying to lift 200 pounds each. And simply looping a rope or chain around the handrails would have bent them inward, and maybe even broken them.
But a yoke? That actually sounded promising. And also sounded like it would require a lot less construction than my previous ideas.
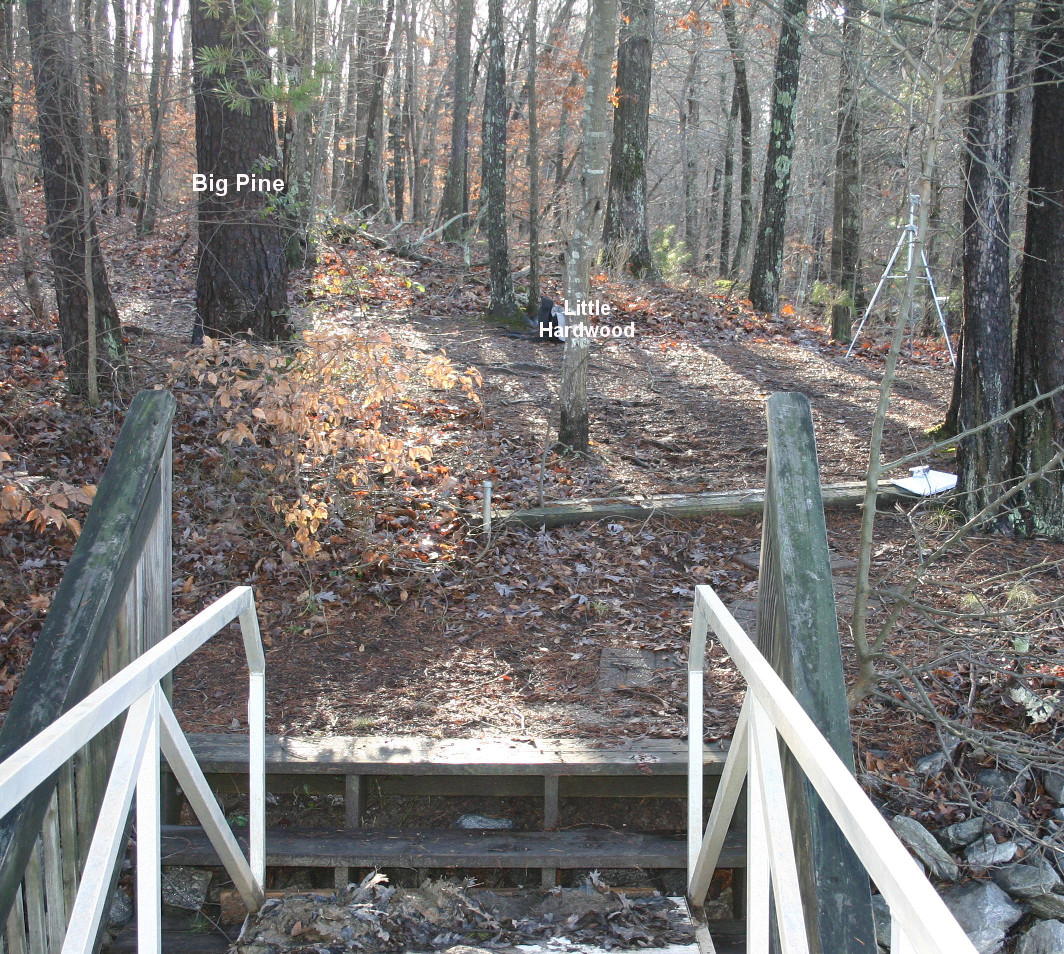
One afternoon during Christmas break, Bo and I ambled down to the lake, where he helped me measure the handrail dimensions, and the distance from the end of the ramp to a reasonable leverage point on the stairs, which turned out to be a manageable 10 feet.
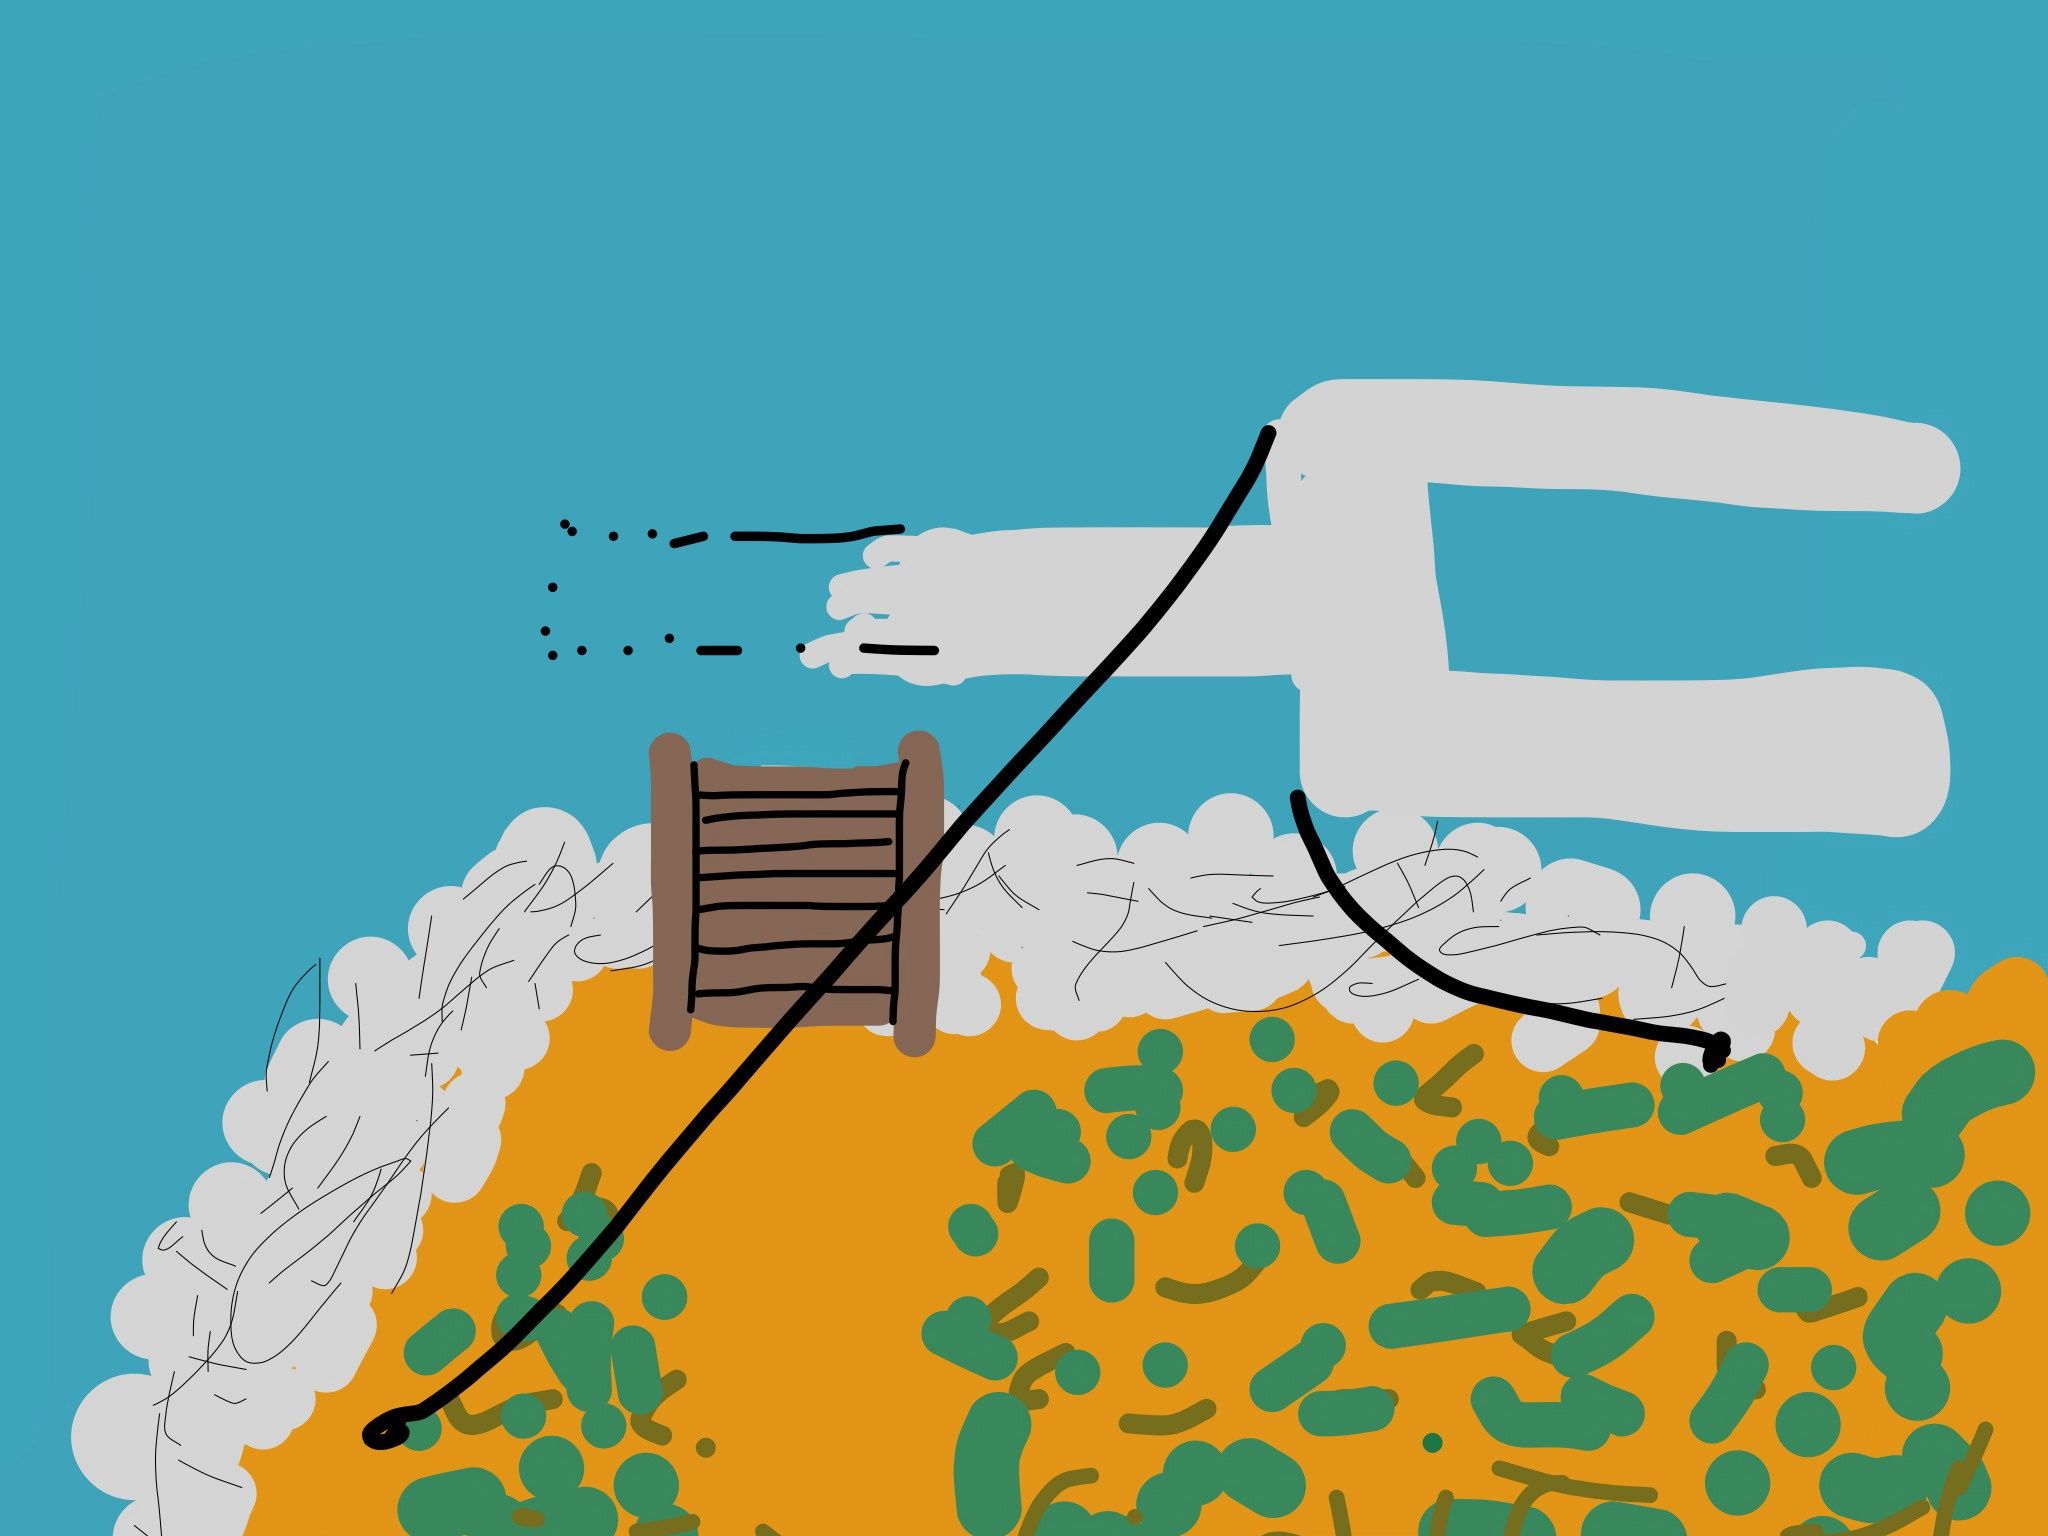
On the Monday after Christmas, the house was quiet, so took the opportunity to hack together a yoke from a 5-foot long piece of 3-inch landscape timber, and some 2x4 pieces. I installed an eyebolt in the middle of the timber (1/2-inch threads with a 1-inch diameter opening), and a screw hook on the opposite side of the eye bolt (see picture), the purpose of which I will describe later in a futile attempt to add some excitement to this otherwise laborious tale. In case your imagination is starting to flag at this point, here's a picture of most of the tools I used in this project. The yoke is at the bottom of the picture.
I took the yoke down to the water, hooked a length of chain to it, and dropped it in, after, of course, tying the chain to the shore with a rope. I've already donated my fair share of heavier-then-water items to that lake. As I suspected, the yoke floated. As I almost completely failed to suspect, it floated upside down, held by the chain. Regardless, I eased into the canoe, and tried to maneuver the yoke into position under the handrail by poking it with a pole. After about 15 minutes of that, I identified two problems with my approach:
To address the second problem, I simply tied the canoe to the nearest handrail.
As for the first problem, here's where the screw hook comes into play. I tied a small mushroom anchor to the screw eye, which pulled the yoke into the correct orientation, and counteracted its natural flotation. And to counteract the anchor's pull, I hooked a floating dock bumper to the chain near the yoke.
Trying once again, this time with the forces balanced, I was able to position the yoke under the hand rail fairly easily using the pole. I secured the line holding the chain to the shore, and headed up to the house for part two, which would involve my Spouse. She was more than willing to help, encouraged perhaps by my minor feeling of accomplishment at getting the yoke into position.
So spouse put on her sensible shoes and coat, and then waited patiently while I modified another landscaping timber, this one at its full 8-foot length. I screwed a couple of pieces of 2x4 to the top to make a "Y", and attached another 2x4 to the bottom. (You can see photo details for this portion by clicking here.)
I grabbed a portable drill and a few more screws, and we lugged the whole collection down the path to the water.
When I got there, I screwed together two 2x6s left over from a previous dock project, to create a 4"x6"x12' beam. I wrapped another length of chain around one end of that beam, and with my Spouse's patient help, balanced it atop the Y on the landscape timber.
The bottom of the timber was held in place by 4 screws protruding from the 2x4 on the bottom. The steps were astoundingly slippery from being in the water for several weeks, so the screws helped hold the timber in place.
Finally, I clipped the two chains together from the canoe, and came back to shore. This drawing shows the side view of the beam-and-timber rig.
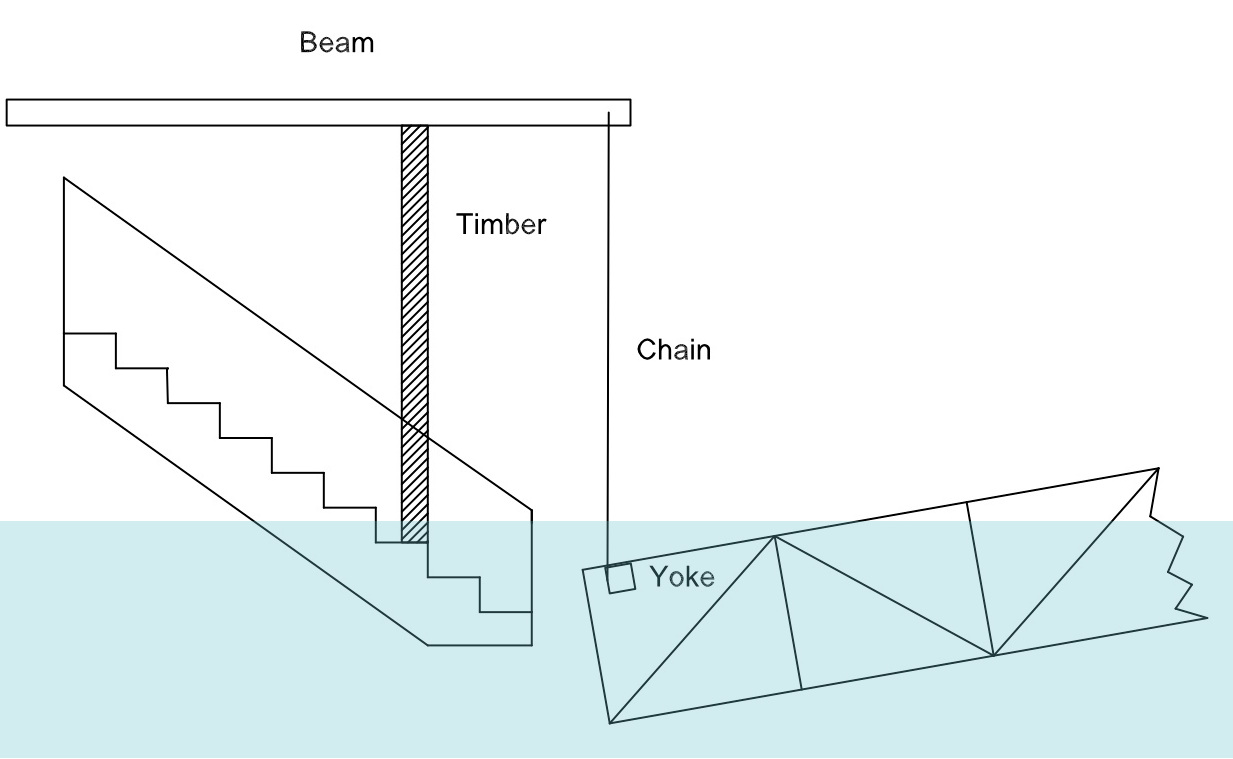
At first, the rig had no mechanical advantage, but I thought my big mass (heh heh) might be enough to do the trick, but the ramp showed no sign of moving. So I moved the timber down a step, and tilted it a little, which gave me something like a 2:1 advantage (as shown in the drawing above). I put my weight on it and...
... still no movement. I was beginning to wonder if it had been caught, trapped, or cemented in place.
Not willing to give up yet, I straddled the beam and sat on it, while my bemused spouse watched from a safe distance. Then I gingerly began to bounce up and down a little. After about 15 seconds of bouncing, a few bubbles rose to the surface, and we actually saw the angle of the ramp change ever so slightly.
Buoyed by this progress, we kept at it a few more minutes until we had managed to move the ramp enough to center it off the end of the steps, still on the bottom, but at least more optimistically aligned.
And by now it was almost too dark to see to walk up the path back to the house, so I tied everything off, and we called it a night.
The next morning the ladies had an appointment, so I slept in late (to store up some extra energy, of course), and Jasper and I headed down to the water with a sack full of gear, including ropes, a come-along, and more chain clips.
The rest of the task went pretty smoothly, by comparison. I set the 12' beam aside, since it is really a 2-person tool, and instead, ran the chain over the Y, and connected it to the come-along, which was roped to a large pine. Using that rig, I was able to lift one side of the ramp up high enough to slip a 2x4 under it, and then a 2x6 on the other side. The photos below show this rig (left) and the two trees described in the next paragraph.
 |
 |
Finally, I moved the rope from the pine to a smaller hardwood which was more centered on the steps, and was able to move the ramp up the steps by just lifting up on the chain with my hands, which provides a lot of mechanical advantage, then using the come-along to secure the progress I had made. In less than an hour, I had the entry-end of the ramp out of the water and on the top step.
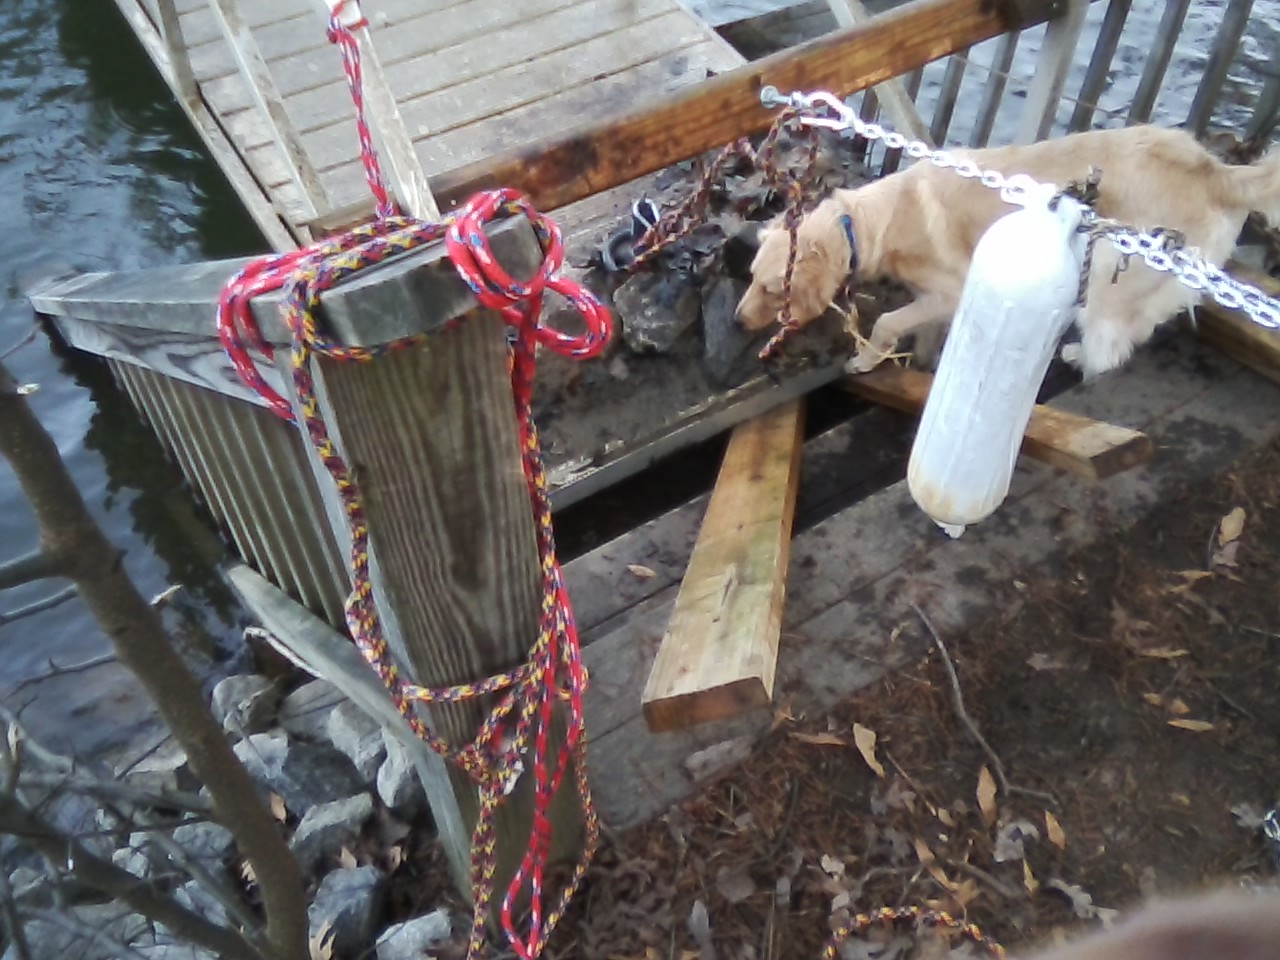
| At this point, I probably shouldn't have been surprised by anything, but I was quite amazed to see rip-rap rocks piled on the end of the
ramp covered with lake mud. I suppose the ramp "scooped" them up as it turned back and forth during the storm and my retrieval efforts.
Out of curiosity, I snuck Ma T's bathroom scale down to the dock (shhh; don't tell her). Turns out there were 7 rocks weighing a total of 86 pounds, plus 41 pounds of dirt holding that sucker down. No wonder it was hard to lift! In the picture you can see the rocks, dirt, and my faithful, four-legged companion. You can also see more details of the rig, including the anchor, the bumper, the yoke, the chain, and the eyebolt. |
 |
And thus ends our tale. As of this writing, the dock has stayed in place through a couple more gusty days. I did tighten the left cable a little more than the previous setting. That puts the ramp at an angle on the steps, instead of it sitting nice and square. But if it prevents another similar tale, I can suppress my OCD enough to deal with the lack of squareness.
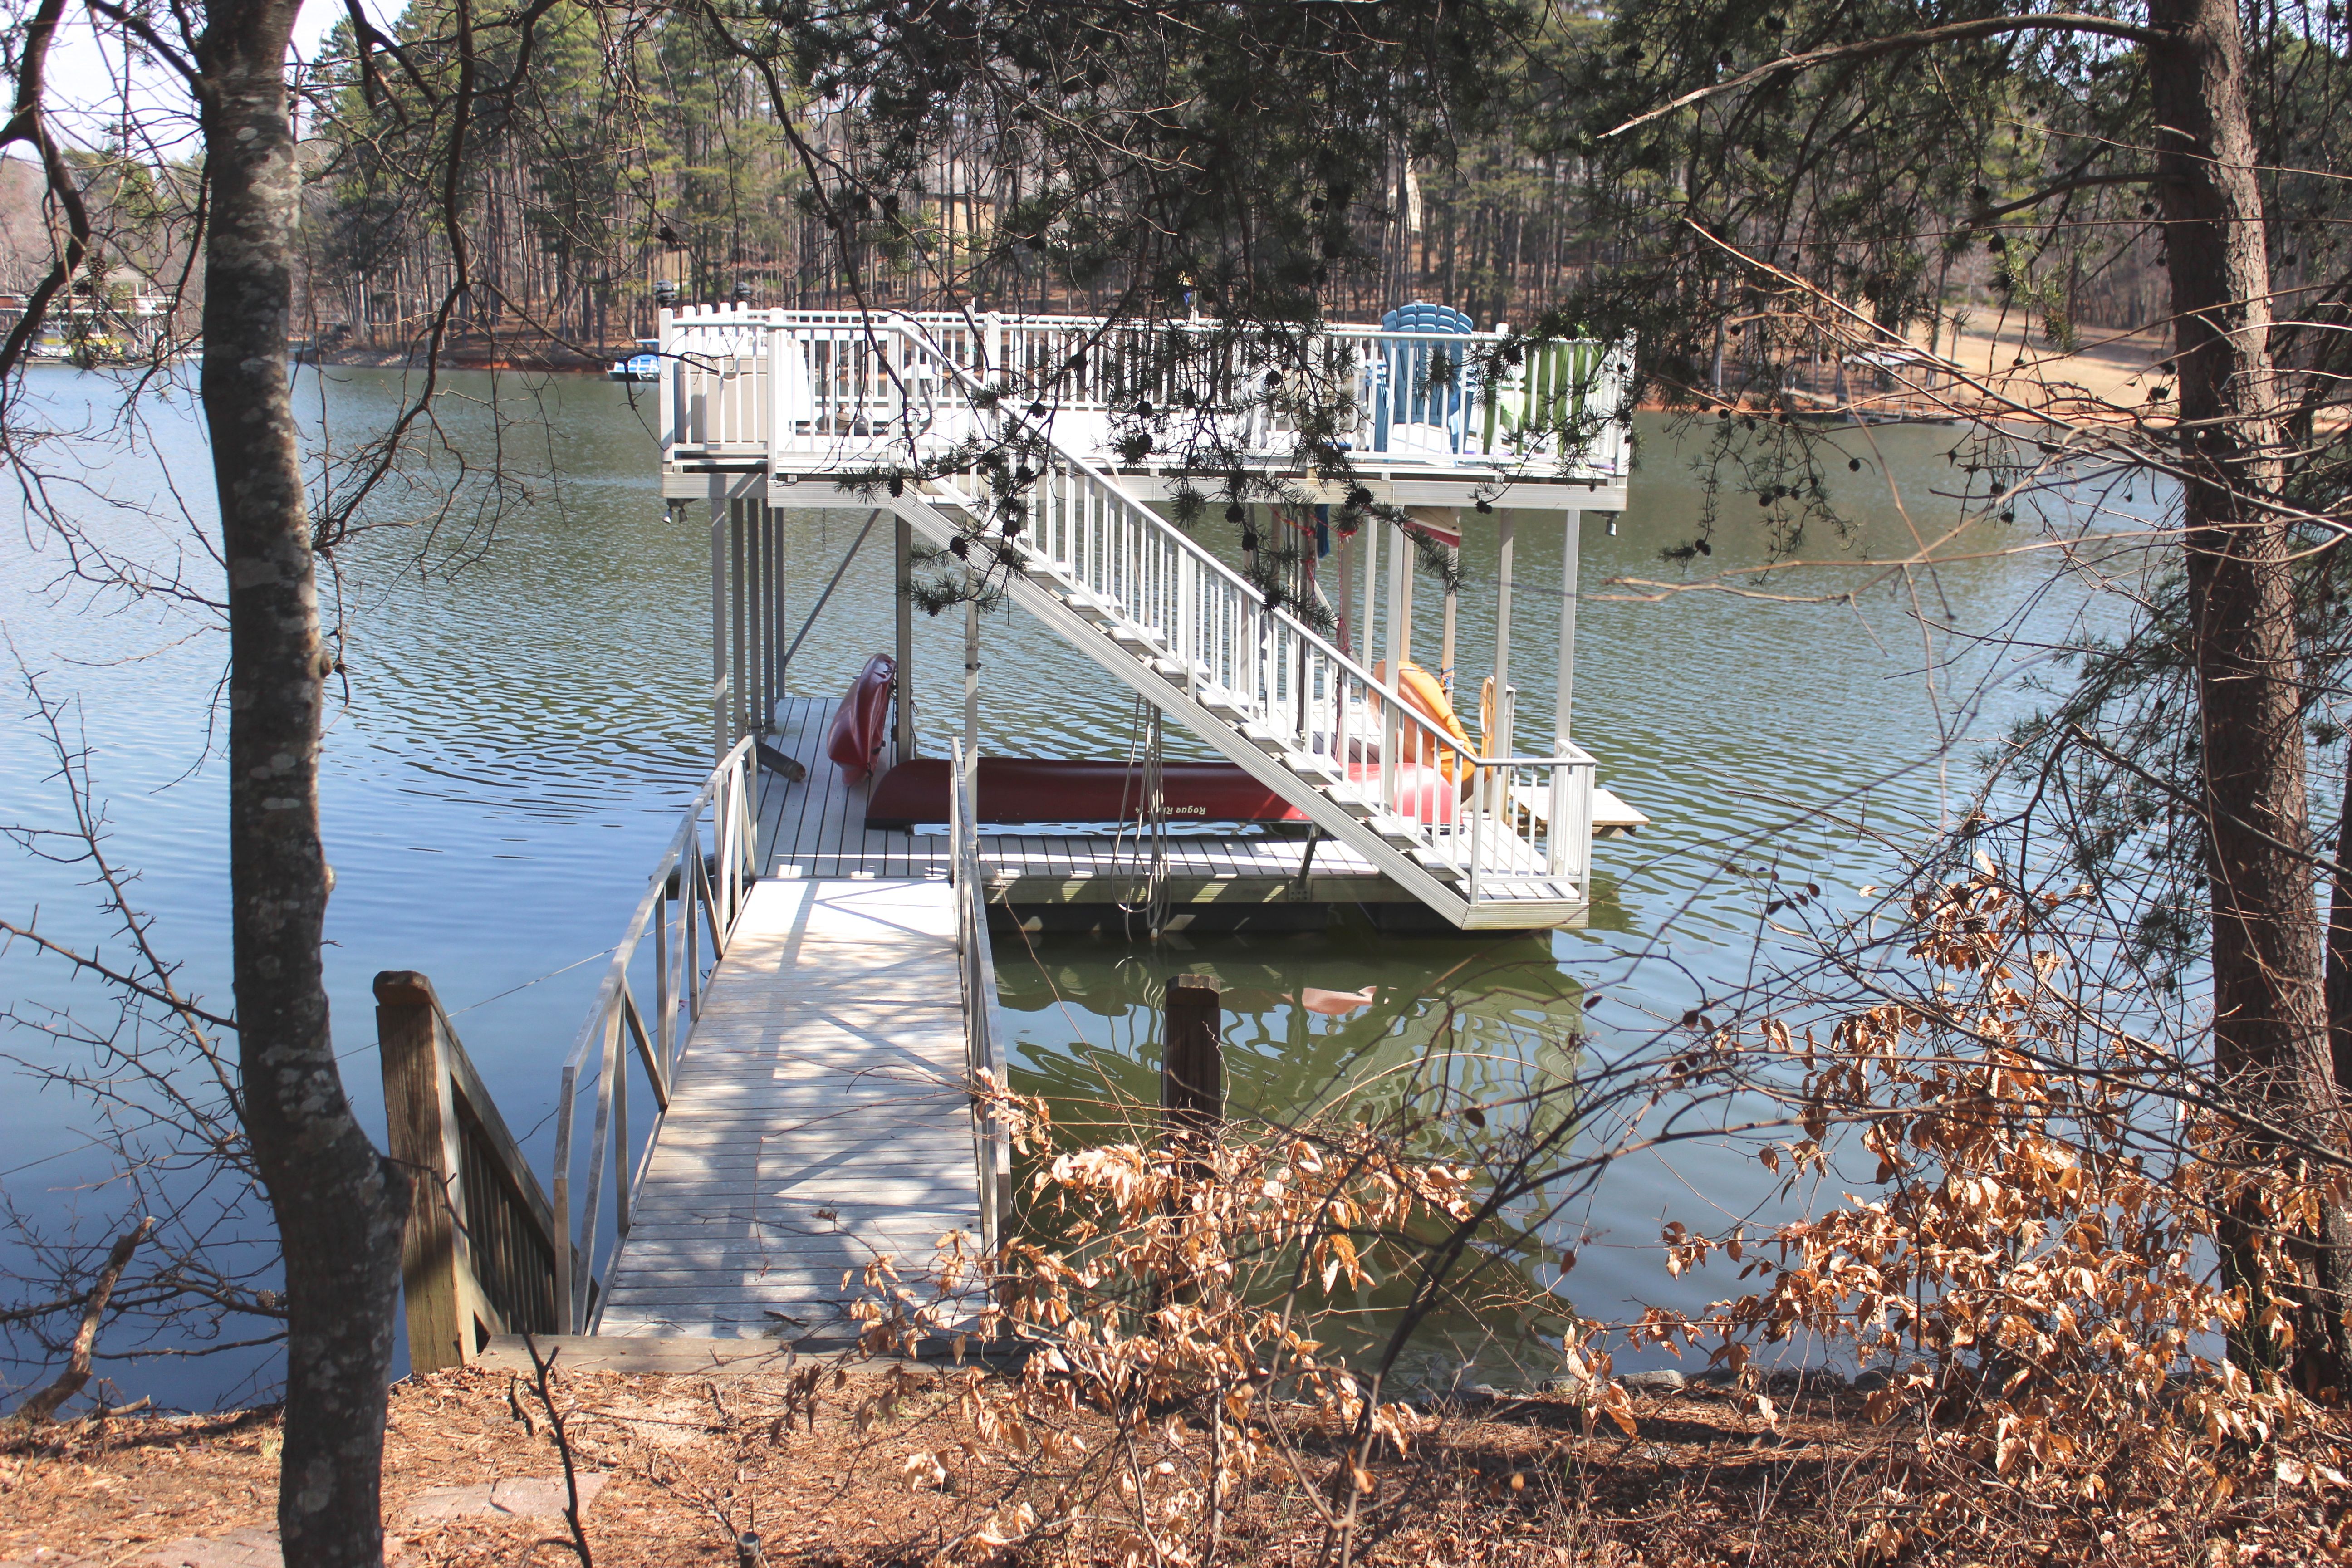
[Added March 2] By request from a reader, here are a couple of pictures of the dock showing it back to "normal."
 |
 |
Writing this took longer than I expected, and like me, you may wonder why I even went to the trouble. Part of me just thinks it is a good story, and that others might learn from it, but most of me just enjoys the process of documenting the event. It was also a nice practical challenge to my basic documentation skills.
Speaking of skills, here are the devices and applications I utilized to create this posting:
Lastly, click here to go to Enoch's Thoughts, either because that's where you came from, or to leave a comment, or if you're just curious.
Posted February 23, 2014
Updated February 27, 2014 to correct html errors and earn the badge below
Updated March 2, 2014 to add pictures of the dock in "normal" state.